
Mini Munchable Jars: Your New Lunchbox BFF (No Plastic Tray Required!)
Hey, my fellow kitchen adventurers! Harper here, waving my trusty wooden spoon at you from my sun-drenched countertop. Raise your hand if you’ve ever stared into the abyss of a store-bought lunch kit and thought… “Really? That’s it?” 🙋♀️ Yeah, me too. Those flimsy plastic trays with their cracker dust and questionable cheese vibes? They scream “Tuesday slump,” not “Tuesday triumph.” But what if I told you we could spin that lunchtime frown upside down with something wildly simple, endlessly customizable, and packed with pure homemade love? Enter: Mini Munchable Jars!
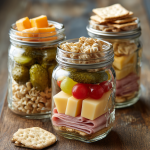
Imagine this: layers of crisp crackers, savory rolled deli meat, creamy cheese cubes, and tangy pickles, all tucked cozily into a humble mason jar. It’s the DIY Lunchable of your dreams – but cuter, tastier, and way more *you*. No more sad desk lunches! These little jarred wonders are perfect for:
- 🧒 Lunchbox heroes: Kids adore the fun, finger-food vibe (and you’ll adore the zero waste!).
- 🧑💼 Desk-duty delights: Pack one for a work lunch that sparks joy, not envy.
- 🚗 Road trip fuel: Grab-and-go goodness that won’t spill in the backseat.
- 🧺 Picnic perfection: Insta-worthy and utterly packable.
Forget soggy sandwiches and hello to crunchy, savory, satisfying layers! We’re talking 5 minutes of assembly magic, infinite flavor combos, and that glorious *pop* when you twist open the jar at noon. Trust me, your taste buds (and your inner child) will throw a tiny party. Ready to ditch the plastic tray and jar up some joy? Let’s roll!
That Time My “Gourmet” Lunch Kit Flopped (Hard)
Okay, story time! Picture little 8-year-old Harper, convinced she was a culinary genius. I’d begged my mom for one of those fancy store-bought lunch kits ALL the kids had. Finally, she caved. Fast forward to lunch hour: I proudly popped open my kit… only to find the crackers had morphed into a sad, damp dust thanks to leaky lunchbox juice. The cheese? Sweating like it ran a marathon. My grand gourmet moment? Total flop. I traded my “fancy” ham for Sarah Miller’s homemade oatmeal cookie and never looked back.
That memory stuck! Years later, packing lunches for my niece Lily, I had flashbacks. One Tuesday, we raided my fridge – leftover roast chicken, some cheddar cubes, pickles, and crackers. We layered them haphazardly in a jam jar just for giggles. Lily dubbed it her “Treasure Jar Lunch.” Watching her eagerly unscrew the lid, fishing out each layer like edible gold? Pure magic. No sogginess, just pure, crunchy delight. That messy experiment birthed these Mini Munchable Jars. It’s proof: sometimes the best recipes start with a childhood lunchbox fail and a happy kid’s imagination!
Gather Your Jar-Worthy Cast of Characters
Here’s the beautiful part: this isn’t rocket science, it’s assembly joy! Use what you love or what’s hanging out in your fridge. This is the basic blueprint per single 8-oz wide-mouth mason jar (makes packing a breeze!):
- 5–6 Small Crackers: Think whole grain rounds, mini pretzels, or even cheesy fish! **Chef Insight:** Sturdier crackers hold up best. Avoid super thin ones that might turn to mush. **Sub Alert:** Gluten-free? Rice crackers or seed crisps work perfectly!
- 3 Slices Turkey or Ham, Rolled: Deli thin-sliced works wonders. **Chef Hack:** Rolling isn’t just cute – it creates air pockets preventing sogginess and makes them easy to grab! **Flavor Twist:** Swap in roast beef, peppered salami, or even leftover grilled chicken sliced thin.
- 2–3 Cubes or Slices Cheddar or Mozzarella: Cubes are classic, slices can be folded. **Chef Insight:** Firmer cheeses (cheddar, gouda, Swiss) travel better than super soft ones (brie). **Dairy-Free?** No sweat! Try cubed tofu marinated in soy sauce or your favorite vegan cheese block.
- 2–3 Mini Dill Pickles or Pickle Slices: The tangy heroes! **Why Bottom Layer?** Their juice is delicious but risky! Containing them at the bottom keeps everything else crisp. **Sub Tip:** Olives, pepperoncini, or even marinated artichoke hearts add a similar zing!
- Optional Extras (The Joy Sparkers!):
- Grapes or Cherry Tomatoes: Burst of freshness! Add *after* pickles but *before* meat/cheese.
- Small Treat: A few chocolate chips, a mini cookie, or a couple of almonds tucked on top.
- Dip It Good: A tiny container of hummus, mustard, or ranch for dunking!
Let’s Build Some Lunch Magic: Step-by-Step
Ready for the easiest “cooking” you’ll do all week? Grab your jars and let’s layer up! Remember: Order is Key to avoid Soggy Cracker Syndrome™.
- Start with the Tangy Foundation: Drop those mini dill pickles or pickle slices straight into the bottom of your clean, dry mason jar. **Why here?** Any brine stays put, far away from your precious crackers! **Chef Hack:** If using juicy extras like tomatoes, add them now too. Think of this as the “moisture zone.”
- Roll Call for Protein & Cheese: Take your turkey or ham slices and roll them up snugly like little savory scrolls. Tuck them gently into the jar on top of the pickles. Next, add your cheese cubes or folded slices. **Pro Tip:** Nestle the cheese *against* the glass so it stays cooler longer. **Stacking Secret:** Alternate meat and cheese slightly for easy grabbing!
- The Crisp Crown Jewel: This is CRUCIAL! For ultimate cracker integrity, you have two genius options:
- Option 1 (Lazy Perfectionist): Simply pile your crackers right on top of the cheese layer. Works great if you’re eating within a few hours!
- Option 2 (Soggy-Proof Guarantee): Place the crackers in a small reusable silicone cupcake liner or even the mason jar lid itself. Screw the *empty* ring band over the liner/lid holding the crackers, then invert it and place it *on top* of the filled jar before screwing on the outer lid. Mind. Blown. 🤯
- Seal the Deal & Chill: Pop on your mason jar lid and screw the band on firmly. Slide your masterpiece into the fridge! **Timing Tip:** These are best assembled the night before or the morning of. The cold keeps everything fresh and safe.
- Pack & Pop! When lunchtime calls, just grab your jar! No need to reheat. Simply unscrew, maybe give it a little shake to loosen layers, and dig in with fingers or a mini fork.
How to Serve Your Jarred Joy
Presentation is half the fun! For kids, let them unscrew the lid themselves – it’s like opening a tasty present. Adults? Channel picnic chic! Dump the contents onto a small plate if you’re feeling fancy, or embrace the casual charm of eating straight from the jar. Pair it with a crisp apple slice or a handful of baby carrots on the side for extra crunch. The beauty? Zero mess, zero fuss. Just pure, packable, delicious satisfaction. See? Lunch just got a major upgrade!
Shake Up Your Jar Routine! 5 Flavor Adventures
Don’t get stuck in a rut! These jars are your blank canvas. Here are 5 ways to riff:
- Mediterranean Escape: Hummus base layer (in a tiny cup), sliced cucumber, kalamata olives, feta cubes, cherry tomatoes, and pita chips.
- Breakfast Bonanza: Layer mini pancake pieces, turkey sausage crumbles, cheddar cubes, and a tiny container of maple syrup for dipping.
- Veggie Powerhouse: Swap meat for chickpeas or white beans. Add bell pepper strips, carrot sticks, snap peas, cheddar, and ranch dip.
- Pizza Party: Mini pepperoni slices, mozzarella balls (bocconcini), halved cherry tomatoes, basil leaves, and garlic breadstick pieces. Pack marinara for dunking!
- Tropical Twist: Diced ham, pineapple chunks, sharp cheddar cubes, and almond crackers. Sweet, salty, crunchy perfection!
Harper’s Hacks & Heart-to-Heart
Confession: My first version of these involved soggy Triscuits because I rebelliously put pickles on TOP. Lesson learned! The evolution? Mastering the moisture barrier (pickles on bottom!) and discovering the inverted-lid cracker trick. It’s become my ultimate fridge-cleaner recipe – that lone slice of roast beef? Jar-worthy! Those last 8 crackers? Perfect! I also love using seasonal finds: apple slices and cheddar in fall, berries and goat cheese in summer. The biggest win? Seeing my niece Lily now make them *for me* when I visit. She even adds secret “love notes” (doodles on the lid!). That’s the real magic: these little jars build kitchen confidence and create sweet memories, one layer at a time. Now go make your own magic!
Your Mini Munchable Jar Questions, Answered!
Let’s tackle those lunch-packing worries head-on:
- Q: Won’t the crackers get soggy overnight?A: The LAYER DEFENSE is key! Keeping pickles/juicy items firmly at the bottom and using the inverted lid trick (or just piling crackers last) works wonders. Using sturdy crackers helps too. If you’re super worried, pack crackers separately in a tiny baggie inside the jar.
- Q: How long do these jars last in the fridge?A: For food safety and peak crispness, assemble them the night before or morning of eating. They’ll be perfect for up to 24 hours in the fridge. I don’t recommend longer as textures (especially crackers) suffer.
- Q: Can I make these for meal prep on Sunday?A: Proceed with caution! Prep your components (slice cheese, roll meat, drain pickles) and store them separately. Assemble jars the night before or morning you need them. Pre-assembling days ahead invites sogginess.
- Q: My kid has allergies. Any swaps?A: Absolutely! This recipe is a swap superstar:
- Gluten-Free: Use GF crackers (rice crackers, lentil chips).
- Dairy-Free: Swap cheese for vegan cheese, marinated tofu cubes, or sunflower seed butter (packed separately).
- Nut-Free: Avoid crackers/nuts with nuts. Seeds (pumpkin, sunflower) are usually safe swaps.
- Pork-Free: Turkey, chicken, roast beef, or even plant-based deli slices work!
Always double-check labels on deli meats and crackers for hidden allergens.
Mini Munchable Jars: DIY Lunchables in a Mason Jar
Description
Say goodbye to sad, soggy lunch trays and hello to layers of crunchy, savory goodness all packed in a charming little mason jar. Perfect for kids, work lunches, road trips, or picnics—these jars are easy to assemble, endlessly customizable, and totally mess-free. Ready to jar up some joy? Let’s do this!
Ingredients
-
5–6 small sturdy crackers (whole grain rounds, mini pretzels, or gluten-free rice crackers)
-
3 slices turkey or ham, rolled (or roast beef, salami, grilled chicken)
-
2–3 cubes or slices of cheddar or mozzarella cheese (or vegan cheese/tofu cubes)
-
2–3 mini dill pickles or pickle slices (or olives, pepperoncini)
-
Optional extras: grapes, cherry tomatoes, mini cookie, nuts, or small dip container (hummus, ranch, mustard)
Instructions
-
Pickle Base: Drop pickles (and juicy extras like tomatoes or olives) at the bottom—this keeps moisture away from crackers!
-
Protein & Cheese Layers: Tightly roll your deli meat and layer on top of pickles. Add cheese cubes next, pressing them against the jar walls to keep cool longer.
-
Crunch Time: Top with crackers. For extra protection, place crackers in a small silicone cupcake liner or jar lid, then invert and screw on before sealing the jar.
-
Seal & Chill: Screw the lid on tight and refrigerate until lunch. Best assembled the night before or morning of eating.
Notes
-
Kids love unscrewing their own jars—it’s like a tasty treasure hunt!
-
Adults can dump contents onto a plate for picnic vibes or eat right from the jar.
-
Pair with fresh fruit or veggies for extra crunch and color.
Nutrition
- Calories: 250 kcal per serving
- Carbohydrates: 18g
- Fiber: 14g
- Protein: 12g
Nutritional Nibbles
(Per jar, based on basic recipe: 5 whole wheat crackers, 3 slices turkey, 2 cheddar cubes, 3 mini pickles)
- Calories: ~250
- Protein: 12g
- Carbohydrates: 18g
- Fat: 14g (mostly from cheese & meat)
- Snack-tactic level: Officially 💯
Note: This is an estimate. Values change based on your specific ingredients and additions!
Final Thoughts
These Mini Munchable Jars aren’t just a lunch solution—they’re a rebellion against boring meals and plastic waste. They prove that a little creativity transforms humble ingredients into something magical. Whether you’re packing them for a kiddo, your work desk, or a sunset picnic, that satisfying pop of the lid never gets old.
So raid your fridge, grab those jars, and start layering. Because life’s too short for sad lunches and soggy crackers. Here’s to meals that spark joy—one perfectly packed bite at a time!