Hello, My Dough-Lovin’ Friends! Let’s Bake Some Magic!
Picture this: golden morning light streaming through your kitchen window, the air humming with the scent of yeast and warm maple, and a tray of pillowy-soft donut bars glistening with a buttery glaze that makes your heart do a happy little flip. That’s the cozy hug we’re baking today! I’m Harper Callahan, your kitchen cheerleader, and I’m *thrilled* to share my ultimate Maple Donut Bars recipe—a double batch, because sharing is mandatory (and let’s be real, one batch vanishes faster than you can say “second breakfast”). These aren’t just donuts; they’re fluffy, bakeable clouds of joy slathered in a rich, maple-kissed glaze that’s like autumn in a bowl. Perfect for lazy Sunday brunches, “I survived Monday” celebrations, or gifting to your neighbor who always lends you sugar. No deep fryer? No problem! We’re baking these babies for fuss-free fun. So tie on your favorite apron, grab that wooden spoon, and let’s turn your kitchen into a donut dreamland. Trust me—your future self (and everyone within sniffing distance) will thank you. 🍁✨
That One Time I Turned a Snow Day Into a Maple Miracle…
Rewind to my first winter in this little sunlit kitchen. A blizzard had buried the city, my pantry was looking sparse, and my craving for something sweet and warm felt urgent. I stumbled upon an old recipe card from my grandma—a simple yeast-raised dough—and decided to improvise. No donut cutter? No worries! I sliced the dough into rustic bars (read: lazy rectangles). I swapped her classic vanilla glaze for maple syrup because, well, Canada. What emerged from the oven felt like alchemy: golden-brown pillows, crisp at the edges but cloud-soft inside. When my snowed-in friends arrived, shivering and starry-eyed, we devoured them straight off the tray, fingers sticky with glaze, laughing as flakes danced outside. That’s when it hit me: the best recipes aren’t about perfection. They’re about warmth, improvisation, and the magic that happens when simple ingredients collide with hungry hearts. These maple bars? They taste like that snowy afternoon—pure, unfussy joy.
What You’ll Need (Let’s Get Organized!)
For the Donut Bars (Double Batch = Double Happiness!):
- 1 cup warm water (105–110°F) – Wakes up the yeast! Too hot? It kills it. Too cold? It naps. Test it on your wrist like baby milk.
- 1 ½ cups warm milk (same temp as water!) – Whole milk = richness. Swap dairy-free milk (oat or almond) for a vegan twist!
- 4 tsp dry active yeast – The engine of fluffiness! Check the expiry date—old yeast = sad, flat donuts.
- 1 ⅛ cups granulated sugar – Sweetens the dough. Reduce to 1 cup if you prefer less sweetness (the glaze packs a punch!).
- 1 tsp salt – Balances the sweetness and strengthens gluten. Sea salt or kosher works great.
- 10 large eggs – Room temp is best! They create structure and richness. For egg-free, try flax eggs (10 tbsp ground flax + 15 tbsp water).
- 1 cup unsalted butter, melted and cooled – Adds tenderness. Salted butter works too—just skip the added salt above.
- 11 cups all-purpose flour – The backbone! Spoon & level into cups—don’t pack it. For fluffier bars, sub 2 cups with bread flour.
For the Maple Glaze (The Liquid Gold!):
- ½ cup unsalted butter – Brown it for a nutty depth! Just cook until golden-brown specks appear.
- 1 cup brown sugar – Dark brown sugar = deeper flavor. Light brown works too.
- 6 tbsp milk – Whole milk or cream = creamier glaze. Almond milk keeps it dairy-free.
- 2 tbsp corn syrup – Secret weapon for shine! Swap honey or agave if needed.
- 4 tsp maple extract – Use the good stuff! Real maple syrup can sub, but reduce milk by 1 tbsp.
- 4 cups powdered sugar – Sift it! No lumps = silky glaze. For less sweetness, start with 3 cups.
Let’s Bake! (Step-by-Step with Chef’s Secrets)
Step 1: Wake Up That Yeast! In your biggest bowl, combine warm water, warm milk, yeast, and 1 tbsp sugar. Give it a gentle stir and let it sit for 5–10 minutes. You’ll know it’s ready when it looks foamy and smells like a bakery’s promise. If it doesn’t bubble? Your liquid was too hot/cold or yeast was old—start over. Chef’s Hack: Add a pinch of sugar to feed the yeast faster!
Step 2: Build the Dough (Arm Workout Included!). Add the remaining sugar, salt, eggs, and melted butter to the yeast mixture. Mix with a wooden spoon until just combined. Gradually add flour, 2 cups at a time, stirring until a shaggy dough forms. Turn it onto a floured surface and knead for 8–10 minutes. You want it smooth and slightly tacky—not sticky. If it sticks, add 1 tbsp flour at a time. Chef’s Hack: Use a stand mixer with a dough hook on medium speed for 6–7 minutes—saves your wrists!
Step 3: First Rise (Patience, Grasshopper!). Place dough in a lightly oiled bowl, turning to coat. Cover with a damp towel or plastic wrap. Let it rise in a warm, draft-free spot until doubled—about 1.5 hours. Chef’s Secret: No warm spot? Preheat your oven to 200°F, turn it OFF, then place the bowl inside with the door cracked.
Step 4: Shape & Second Rise (Hello, Donut Bars!). Punch down the dough (so satisfying!). Roll it out on a floured surface into a ½-inch thick rectangle. Cut into 3×1-inch bars using a knife or pizza cutter. Place them 1 inch apart on parchment-lined baking sheets. Cover lightly and let rise 30–45 minutes until puffy. Chef’s Tip: Re-roll scraps once—overworking makes tough donuts.
Step 5: Bake or Fry? Your Call!
To Bake (My Fuss-Free Fave!): Preheat oven to 375°F (190°C). Bake for 10–12 minutes until golden. Rotate pans halfway! Chef’s Test: Tap a bar—it should sound hollow.
To Fry (Classic Crispiness!): Heat oil (like canola or vegetable) to 350°F in a deep pot. Fry bars 1–2 minutes per side until golden. Drain on paper towels. Safety Tip: Never leave hot oil unattended!
Step 6: Whip Up That Maple Dream Glaze. While bars cool slightly, melt butter in a saucepan over medium heat. Stir in brown sugar, milk, and corn syrup. Simmer for 1 minute (don’t boil!). Remove from heat. Whisk in maple extract and powdered sugar until smooth. Chef’s Hack: Too thick? Add milk, 1 tsp at a time. Too thin? Add more powdered sugar.
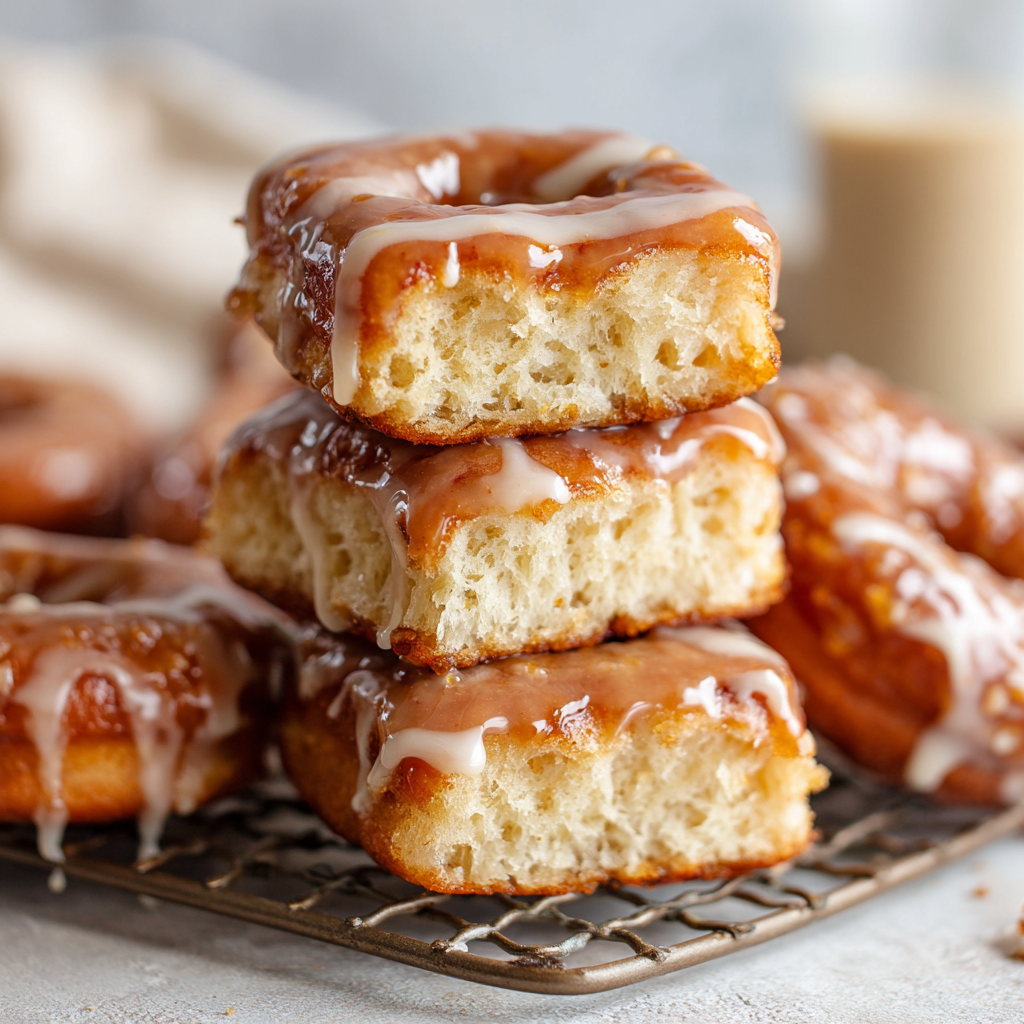
Step 7: Glaze Glory! Dip warm (not hot!) bars top-down into the glaze. Let excess drip off, then place on a wire rack set over parchment (for easy cleanup). For extra indulgence, double-dip! Chef’s Joy: Sprinkle with chopped pecans or flaky sea salt right after glazing.
Serving Up the Cozy
Pile these maple donut bars high on a rustic wooden board or a vintage cake stand for serious brunch vibes. Serve them warm with a cold glass of milk or hot coffee—the glaze will shimmer invitingly! For a crowd, set up a DIY topping bar with extras like toasted pecans, crispy bacon bits (trust me!), or a drizzle of melted chocolate. They’re perfect for gifting too: stack 3–4 in a cellophane bag tied with twine. Pure edible sunshine!
Mix It Up! (5 Tasty Twists)
- Apple Cider Spice: Swap ½ cup milk with boiled-down apple cider. Add 1 tbsp cinnamon + 1 tsp nutmeg to the dough.
- Chocolate-Maple Bliss: Fold 1 cup mini chocolate chips into the dough. Add 2 tbsp cocoa powder to the glaze.
- Vegan Wonder: Use flax eggs, plant-based milk/butter, and swap corn syrup for agave. Ensure sugar is vegan-friendly!
- Bacon & Bourbon: Fold ½ cup cooked, crumbled bacon into the dough. Spike the glaze with 1 tbsp bourbon instead of maple extract.
- Lemon-Maple Zing: Add 2 tbsp lemon zest to the dough. Replace 1 tsp maple extract with lemon extract in the glaze.
Harper’s Honest Notes
This recipe evolved from my “maple emergency” snow day! Originally, I used a single batch, but friends kept begging for more—so we doubled it. Pro tip: The dough freezes beautifully! After the first rise, shape the bars, freeze on a tray, then bag them. When cravings strike, thaw, let rise, and bake. One time, I subbed bacon fat for half the butter in the glaze (wild, right?). It was smoky-sweet heaven… but maybe save that for your adventurous pals. Remember, baking is play. If your bars aren’t perfect? Slather on extra glaze and call them “artisanal.” The real magic is in the mess and the memories you make. Now go lick that spoon—I won’t tell! 😉
Your Questions, Answered!
Q: My dough didn’t rise! Help!
A: *Hugs* Let’s troubleshoot! 1) Yeast was old or liquid was too hot/cold. Always test temps! 2) Your kitchen was chilly. Try my oven rise hack (Step 3). 3) Salt or sugar killed the yeast? Mix yeast with liquid/sugar first, then add salt later.
Q: Can I make these ahead?
A: Absolutely! Bake bars, cool completely, and store unglazed in an airtight container for 2 days. Warm slightly before glazing. Glazed bars are best eaten day-of, but they’ll last 1–2 days (if hidden well!).
Q: Why are my bars dense, not fluffy?
A: Over-kneading or over-flouring is the usual suspect. Stop kneading when smooth! Measure flour carefully (spoon & level). Also, don’t skip the full rise time—yeast needs its beauty sleep.
Q: Can I use instant yeast?
A: Yes! Use the same amount. Skip the activation step—mix it directly into the flour. Easy peasy!

Maple Donut Bars
- Total Time: 2 hrs (with rising)
Description
These Maple Donut Bars are soft, yeasted dough bars baked to golden perfection and dipped in a rich, buttery maple glaze. No deep fryer needed—just easy, oven-baked goodness that tastes like a cozy fall morning!
Ingredients
For the Donut Bars:
-
1 cup warm water (105–110°F)
-
1½ cups warm milk (same temp as water)
-
4 tsp active dry yeast
-
1⅛ cups granulated sugar
-
1 tsp salt
-
10 large eggs, room temperature
-
1 cup unsalted butter, melted & cooled
-
11 cups all-purpose flour (spooned & leveled)
For the Maple Glaze:
-
½ cup unsalted butter
-
1 cup brown sugar
-
6 tbsp milk
-
2 tbsp corn syrup (or honey)
-
4 tsp maple extract
-
4 cups powdered sugar, sifted
Instructions
1. Activate the Yeast
-
In a large bowl, mix warm water, warm milk, yeast, and 1 tbsp sugar.
-
Let sit 5–10 mins until foamy.
2. Make the Dough
-
Add remaining sugar, salt, eggs, and melted butter to the yeast mixture.
-
Gradually mix in flour until a soft dough forms.
-
Knead 8–10 mins (or use a stand mixer with a dough hook for 6–7 mins).
3. Let the Dough Rise
-
Place dough in a greased bowl, cover, and let rise 1.5 hours until doubled.
4. Shape & Second Rise
-
Roll dough into a ½-inch thick rectangle.
-
Cut into 3×1-inch bars, place on baking sheets, and let rise 30–45 mins.
5. Bake
-
Preheat oven to 375°F (190°C).
-
Bake 10–12 mins until golden.
6. Make the Glaze
-
Melt butter, then stir in brown sugar, milk, and corn syrup. Simmer 1 min.
-
Remove from heat, whisk in maple extract and powdered sugar until smooth.
7. Glaze & Serve!
-
Dip warm bars into glaze, let excess drip off.
-
Enjoy immediately or let set on a wire rack.
Notes
✅ Use room temp eggs for better dough texture.
✅ Don’t over-knead—stop when smooth and elastic.
✅ Freeze unbaked dough for later—thaw, rise, and bake fresh!
- Prep Time: 30 mins (+ rising)
- Cook Time: 12 mins
Nutrition
- Calories: 290 kcal per serving
- Fat: 11g
- Carbohydrates: 40g
- Protein: 6g
Nutritional Nibbles (Per Bar)
Calories: ~290 | Sugar: 24g | Fat: 11g | Carbs: 40g | Protein: 6g
Note: This is an estimate. Values change with substitutions or extra glaze (worth it!).
Final Thoughts: The Donut Bar Doctrine
These maple donut bars are more than a recipe—they’re a rebellion against kitchen perfectionism. They’re for snow days, sleepy Sundays, and “I need a hug but I’ll settle for carbs” moments. Whether you bake or fry, glaze with abandon or keep it minimalist, remember: The messier the fingers, the better the memory. Now go forth and let that maple-scented joy linger in your kitchen (and on your sweatpants). Life’s too short for sad snacks