Ditch the Drive-Thru: Let’s Make Magic with Homemade Fluffy Doughnuts!
Hey there, kitchen bestie! Harper here, waving my flour-dusted wooden spoon at you from my sunlit counter. 🥰 Remember that feeling? The one where you walk past a bakery, catch a whiff of something warm and sugary, and your inner five-year-old does a full-on happy dance? That’s the doughnut dream. And guess what? We’re making that dream come true right here in your kitchen. No fancy equipment, no intimidation – just pure, fluffy, melt-in-your-mouth joy.
Listen, I get it. Frying dough might seem like something only grandmas or pastry wizards do. I once thought that too! My first doughnut attempt? Let’s just say it resembled a hockey puck more than a pillow. But that’s the beauty of cooking – it’s all about the journey (and the delicious, delicious detours). These homemade doughnuts? They’re not just food; they’re little clouds of celebration. They turn a sleepy Sunday morning into an event, a “just because” Tuesday into a reason to grin. The moment you pull one out of that shimmering oil, golden and perfect, and take that first bite… oh honey, store-bought will never hit the same. The texture? Pure, airy bliss. The flavor? Deeply comforting, like a hug for your taste buds. And the best part? That incredible pride when someone whispers, wide-eyed, “Wait… *you* made these?” Yeah. That feeling? We’re chasing it today. So tie on your favorite apron, crank up your feel-good playlist, and let’s get ready to sizzle, sprinkle, and savor our way to doughnut heaven. Your kitchen is about to smell like pure happiness!
My Doughnut Epiphany: More Than Just Sugar & Flour
My doughnut obsession started way before I knew my way around yeast. Picture it: Me, maybe 8 years old, perched on my Nonna’s worn kitchen stool, feet swinging wildly. Her kitchen always smelled like garlic and rosemary… except on Sunday mornings. That’s when the magic happened. She’d pull out her heavy cast-iron pot, fill it with oil, and transform humble dough into these golden, sugar-dusted wonders. It wasn’t just about the eating (though, oh boy, the eating!). It was the ritual. The way she’d gently poke the risen dough, the soft *plop* as they hit the hot oil, the patient turning with her long fork. I’d watch, mesmerized, as they puffed up like little edible balloons. She’d always let me “test” the very first one – blisteringly hot, impossibly light, coated in a simple shower of granulated sugar that crunched ever so slightly before giving way to that cloud-like interior. My fingers would be sticky, my cheeks powdered white, and my heart so full. It wasn’t just a breakfast treat; it was pure, unadulterated love fried in oil. Years later, after a particularly disastrous batch of my own (we don’t talk about the ‘sinkers of 2012’), I finally cracked her code. That first successful batch I made? It wasn’t just doughnuts. It was a warm, sugary hug from the past, a reminder that sometimes the simplest things – flour, yeast, hot oil, and love – create the most profound joy. That’s the spirit we’re bringing into your kitchen today.
Gathering Your Fluffy Cloud Supplies
Okay, team! Time to raid the pantry. These ingredients are simple, but each one plays a superstar role in creating our fluffy dream team. Don’t sweat substitutions – I’ve got your back!
- 3 cups all-purpose flour: The trusty backbone! It gives structure without making things tough. Need a swap? Bread flour works great for extra chew, or use 1:1 gluten-free all-purpose blend (look for one with xanthan gum).
- ¼ cup unsalted butter, softened: Hello, richness and tenderness! Softened is KEY for easy mixing. Salted butter? Just skip the added salt below. Vegan? Use a good plant-based stick butter (not the tub kind!).
- ¾ cup warm milk (about 110°F/43°C): Yeast’s happy place! Warmth wakes it up, but too hot kills it – think baby bottle warm. Whole milk is dreamy, but 2% or even your favorite unsweetened almond/oat milk works!
- 1 large egg, room temperature: Our binder and fluff-enhancer! Room temp blends smoother. Egg-free? A flax egg (1 tbsp ground flax + 2.5 tbsp water, sit 5 mins) is my go-to.
- ¼ cup granulated sugar: Sweetness for us, *food* for the yeast! Don’t reduce it much or your yeast might get sluggish. Coconut sugar or maple syrup work, but the dough color will be darker.
- ¾ teaspoon fine salt: The flavor booster! It balances the sweetness and strengthens the gluten. Sea salt or kosher salt? Use the same amount if fine, or bump up to 1 tsp if coarse.
- 1 teaspoon active dry yeast: The magic puff-maker! Ensure it’s fresh. If your packet’s been open a while, proof it with the warm milk/sugar first to check for bubbles. Instant yeast? You can mix it right in with the dry ingredients!
Chef’s Whisper: “Room temp ingredients are dough’s BFFs! They help everything blend seamlessly, leading to a smoother rise and fluffier texture. Plan ahead!”
Let’s Get Our Doughnut Dance On: Step-by-Step!
Alright, besties, channel your inner pastry chef! This is where the fun (and the fluff!) happens. Follow these steps, lean into my tips, and you’ll be golden (literally!).
- Wake Up the Yeast: In your mixing bowl, combine the warm milk and granulated sugar. Gently sprinkle the yeast over the top. Do not stir! Just let it sit there like a little island for 5-10 minutes. You’re looking for a foamy, creamy layer – that’s your yeast shouting, “I’m alive and ready to party!” (Tip: No foam? Your milk might be too hot/cold or the yeast is old. Start over – it’s crucial!).
- Build the Dough Dream Team: Add the softened butter, room temp egg, flour, and salt to the foamy yeast mixture. Using the dough hook on your stand mixer (or a sturdy wooden spoon and your own awesome muscles), mix on low speed until it just starts to come together into a shaggy mess. Scrape down the sides. Chef’s Hack: If it feels too dry, add milk 1 TEASPOON at a time. Too sticky? Flour your hands, not the bowl! Add flour sparingly while kneading.
- Knead for Glory: Now, knead! If using a mixer, medium speed for 8-10 minutes. By hand? Turn it out onto a lightly floured surface and push, fold, turn for a good 10-12 minutes. You want it smooth, elastic, and slightly tacky but not sticking badly to your fingers. It should feel alive! Do the “windowpane test”: Stretch a small piece – if you can see light through it thinly without it tearing immediately, you’re golden!
- First Rise: Let It Breathe! Shape the dough into a ball. Place it in a lightly greased bowl (I use the same mixing bowl, wiped clean and oiled!), turning once to coat. Cover tightly with plastic wrap or a damp kitchen towel. Find a warm, draft-free spot (like an off oven with the light on!). Let it rise for 1 to 1.5 hours, until doubled in size. Patience Power! Rushing this = dense doughnuts.
- Shape & Cut: Gently punch down the risen dough (so satisfying!). Turn it out onto a lightly floured surface. Roll it out evenly to about ½ inch thick. Use a doughnut cutter (or a 3-inch round cutter + a 1-inch cutter for the hole, or even a glass and a shot glass!). Dip your cutter in flour between cuts to prevent sticking. Place cut doughnuts and holes onto parchment-lined baking sheets. Re-roll scraps gently once.
- Second Rise: Fluff Factor! Cover the cut doughnuts loosely with clean kitchen towels or plastic wrap (don’t let it touch them). Let them rise again for 30 minutes. They should look noticeably puffy! Pro Tip: This rise is shorter but vital for that airy texture.
- Fry Time: The Golden Moment! Heat 2-3 inches of neutral oil (like canola, vegetable, or peanut) in a heavy-bottomed pot (Dutch oven is perfect!) to 350°F (175°C). Use a thermometer! Accuracy is key for even cooking. Carefully slide in 2-3 doughnuts at a time (don’t crowd!). Fry for about 60-90 seconds per side until deep, glorious golden brown. They’ll flip themselves when ready sometimes! Use a spider strainer or slotted spoon. Don’t forget the holes – they cook faster (30-45 sec/side)!
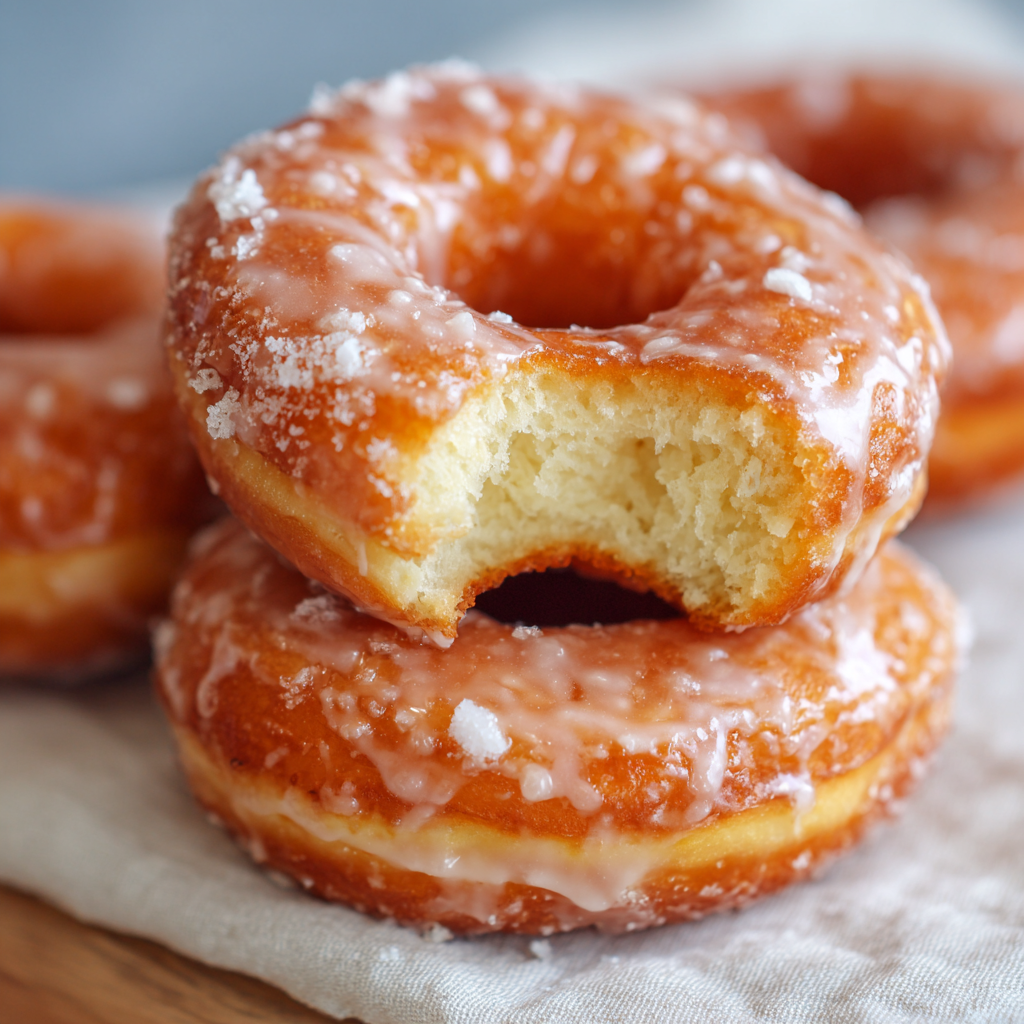
- Drain & Dream: Transfer fried beauties to a wire rack set over paper towels. Let excess oil drip off. CRITICAL STEP: Let them cool slightly (5 mins) before glazing or sugaring! Hot doughnuts melt toppings too fast.
- Glaze, Sugar, Fill & Devour! The fun part! Dip warm (not hot!) doughnuts in your favorite glaze (see variations!), roll in cinnamon sugar, or inject with jam or custard. Enjoy immediately for maximum cloud-like bliss!
Safety Note: Hot oil is no joke! Keep kids/pets away, use a deep pot to prevent splashes, and never leave it unattended. Have a lid nearby just in case (smother flames, never use water!).
Showtime! Serving Your Homemade Masterpieces
Presentation is half the fun! Skip the plain plate. Pile these fluffy clouds high on a vintage cake stand or a rustic wooden board. Mix and match toppings – some glazed, some sugared, some filled. Scatter the adorable doughnut holes around the base like edible confetti. For a brunch showstopper, serve alongside strong coffee, cold milk, or even a sparkling mimosa. The key? Serve them warm-ish! That’s when the texture is pure magic – crisp outside yielding to that impossibly soft, airy interior. Watch those eyes light up as your friends and family reach for seconds (and thirds!).
Flavor Fiesta! Doughnut Variations to Try
Once you master the basic cloud, the sky’s the limit! Here are 5 delicious twists:
- Classic Vanilla Glaze: Whisk 1.5 cups powdered sugar, 3-4 tbsp milk or cream, and 1 tsp pure vanilla extract until smooth. Dip tops of warm doughnuts.
- Cinnamon Sugar Toss: Mix 1 cup sugar + 1 tbsp cinnamon in a bowl. Toss warm doughnuts immediately after frying.
- Chocolate-Hazelnut Dream: Fill cooled doughnuts with Nutella using a piping bag fitted with a long tip. Dust with powdered sugar.
- Lemon Poppyseed Joy: Add 2 tbsp poppy seeds + zest of 1 lemon to the dry ingredients. Glaze with lemon juice + powdered sugar.
- Baked (Not Fried!) Option: For a lighter touch, arrange risen doughnuts on a parchment-lined sheet. Bake at 375°F (190°C) for 10-12 mins until golden. Brush with melted butter, then glaze or sugar!
Harper’s Honest Doughnut Diaries
Confession time: My first solo doughnut adventure? Epic fail. I misread the yeast amount (think “tablespoon” not “teaspoon”!), let it rise way too long in a sweltering kitchen, and ended up with doughnut-flavored lava erupting from my pot! Oil everywhere, smoke alarm serenade… the whole nine yards. I almost hung up my apron. But then I remembered Nonna’s patient hands. I tried again. And again. This recipe? It’s the result of all those happy (and slightly smoky) accidents. Over the years, I’ve learned the magic is truly in the feel – knowing when the dough is kneaded enough, trusting the rise, not freaking out if one doughnut hole looks like a tiny abstract sculpture. The biggest evolution? Embracing the mess! Flour on the floor, a speck of glaze on your nose… it’s all part of the delicious, joyful chaos. These doughnuts aren’t about perfection; they’re about the laughter shared while making them, the anticipation as they puff in the oil, and the pure, unadulterated bliss of that first fluffy bite. That’s the real recipe.
Doughnut Dilemmas? Solved!
Q: Help! My dough didn’t rise! What went wrong?
A: Don’t panic! The usual suspects: 1) Yeast was old or dead (always proof it!). 2) Liquid was too hot (killed yeast) or too cold (yeast stayed asleep). 3) Rise spot was too cold/drafty. Next time, ensure your yeast foams during proofing and find that cozy warm spot!
Q: My doughnuts are dense/heavy, not fluffy. Why?
A: Fluff-flops often happen if: 1) You skipped or rushed the second rise (that 30-min puff is crucial!). 2) You over-kneaded the dough (making it tough). 3) The oil temp was too low (they soaked up oil instead of puffing). Use that thermometer! 350°F is the sweet spot.
Q: They’re browning too fast outside but raw inside! Ahh!
A: Classic sign your oil is TOO HOT! Quickly pull the pot off heat, let it cool down 20-25 degrees, then resume frying. Always monitor the temp and adjust the burner as needed. Frying is active!
Q: Can I make the dough ahead?
A: Absolutely! After the first rise (step 4), punch down the dough, wrap tightly in plastic, and refrigerate overnight. The next day, let it sit at room temp for 30 mins, then roll, cut, do the second rise, and fry! Chilled dough can sometimes take a bit longer for the second rise.
Homemade Fluffy Doughnuts
- Total Time: 39 minute
Description
Welcome to your new favorite Friday night tradition. This homemade pizza dough is easy, tender, flavorful, and built for blistered edges, crispy bottoms, and chewy bites that beg for one more slice. Whether you’re a dough newbie or flour-dusted pro, this recipe brings that true pizzeria magic into your kitchen—minus the soggy delivery box. One bowl, a little patience, and you’re rolling in style!
Ingredients
-
1 cup warm water (110°F)
-
1 tsp sugar (or honey/maple)
-
2¼ tsp active dry yeast (1 packet)
-
2½ cups all-purpose flour (plus extra for kneading)
-
1 tsp salt
-
1 tbsp Italian seasoning (optional, but chef’s kiss!)
-
4 tbsp olive oil
Instructions
-
Proof yeast: Stir sugar into warm water. Sprinkle in yeast. Let sit 5–10 mins until foamy.
-
Mix & knead: Add flour, salt, seasoning, and oil. Mix until shaggy dough forms. Knead on floured surface 6–8 mins until smooth and elastic.
-
First rise: Place in greased bowl, cover, and let rise in warm spot 60–90 mins, until doubled.
-
Shape: Punch down, roll or stretch into desired shape.
-
Bake: Top your pizza. Bake at 475°F for 10–12 mins on a preheated stone or sheet pan.
Notes
-
Sticky dough = airy crust. Don’t over-flour!
-
Let oven + pan heat 30 mins before baking.
-
Add garlic or herbs into the dough for epic aroma.
-
Make-ahead: After rise, store in fridge (3 days) or freezer (3 months).
- Prep Time: 15 mins
- Cook Time: 10–12 mins
Nutrition
- Calories: 160 kcal per serving
- Sodium: 300mg
- Fat: 6g
- Carbohydrates: 23g
- Protein: 3g
Nutritional Nibbles (Per Doughnut, Without Toppings)
Calories: 190 | Fat: 6g | Carbohydrates: 30g | Sugars: 5g | Protein: 4g | Sodium: 150mg
Remember, these are treats! Enjoy them mindfully as part of your joyful eating journey.
Final Thoughts: Why Homemade Doughnuts Are Worth the Effort
Sure, grabbing a box from the drive-thru is easy. But homemade doughnuts? They’re an experience. The scent of yeast and sugar filling your kitchen, the satisfaction of watching dough transform into golden puffs, the joy of biting into a warm, melt-in-your-mouth creation—it’s pure magic.
Beyond taste, making doughnuts is about connection. It’s the laughter of kids rolling doughnut holes in cinnamon sugar, the nostalgia of recreating a grandparent’s recipe, the pride of presenting a platter of homemade treats to friends.