
Hey Brunch Lovers! Let’s Make Magic in a Muffin Tin
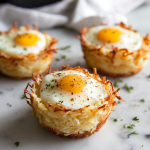
Picture this: golden, crispy hash browns cradling a silky baked egg, all nestled in a muffin cup like a little edible hug. That’s the glory of Hash Brown Egg Baskets—your new secret weapon for turning lazy Sundays (or hectic Wednesdays!) into something special. I’m not gonna lie, friends: the first time I saw these beauties, I did a happy dance right there by the oven. They’re that good. And the best part? They’re ridiculously easy. No fancy skills needed—just a muffin tin, a handful of pantry staples, and 45 minutes. Whether you’re feeding hungry kids, impressing your in-laws, or treating yourself to a solo brunch date, these baskets deliver crunch, comfort, and that Instagram-worthy “wow” factor. So tie on your favorite apron, crank up the coffee machine, and let’s turn spuds and eggs into edible art. Trust me, your breakfast game’s about to level up! 🥔✨
When My Niece Stole the Show (and the Cheese)
Let me take you back to a snowy Sunday last winter. My 7-year-old niece, Luna, burst into my kitchen wearing a unicorn onesie, declaring: “Uncle Chef, we NEED to cook something magical.” Challenge accepted! We whipped up these hash brown baskets together, giggling as we squeezed potato shreds into muffin cups like playing with edible Play-Doh. Luna’s job? Cracking the eggs. She approached it with the intensity of a brain surgeon—tongue poked out, hands trembling—until… sploosh! Egg white cascaded down the muffin tin like a tiny avalanche. We both froze, then exploded into laughter. But here’s the kicker: that “messy” basket baked into the crispiest, most lacy-edged one of the batch! Luna dubbed it the “Volcano Egg” and proudly claimed it. Now, every time we make these, she demands extra cheese “for science” (her code for sprinkling it everywhere). That’s the real magic of this recipe: it’s not just food, it’s a memory-maker.
Your Basket-Building Toolkit 🛒
- 3 cups shredded hash browns – Fresh or thawed frozen work great! Chef tip: Squeeze ’em DRY in a towel—wet potatoes = soggy baskets.
- 2 tbsp melted butter – Binds the spuds and adds richness. Vegan? Swap in olive oil or melted coconut oil.
- Salt & pepper – Season generously! Potatoes need love.
- 6 large eggs – Room temp eggs bake more evenly. Farm-fresh? Even better!
- Optional toppings – Shredded cheddar (my fave), crispy bacon bits, or fresh chives. Got leftovers? Throw in diced ham or sautéed mushrooms!
See? No rocket science here! The beauty is in the simplicity. Pro move: Add a pinch of garlic powder or smoked paprika to the hash brown mix for extra oomph. And if you’re gluten-free pals? You’re golden—this recipe’s naturally GF!
Let’s Build Those Beautiful Baskets 👩🍳
Step 1: Fire Up & Prep
Preheat your oven to 400°F (200°C). Now, grab that muffin tin—non-stick or not—and GREASE IT LIKE YOU MEAN IT. Seriously, coat every nook with butter, oil, or non-stick spray. Hash browns love to cling for dear life! Chef hack: Use a pastry brush to get into crevices.
Step 2: Spud Alchemy
In a big bowl, toss hash browns with melted butter, 1 tsp salt, and ½ tsp pepper. Squish it all together with your hands (the best tools!). Feel that? You want the shreds slightly softened and glossy. Watch for: Dry spots! Add another tsp of melted butter if needed.
Step 3: Nest Building
Divide the mixture into 6 muffin cups. Now, PRESS FIRMLY! Use your fingers or a small glass to compact the shreds up the sides and bottom, forming a ¼-inch-thick “nest.” No flimsy walls—we want structural integrity! Chef secret: Bake these empty first for max crispiness. Skipping this = sad, soft baskets.
Step 4: First Bake (Crucial!)
Slide the tin into the oven. Bake 20-25 mins until edges turn deep gold and centers hold shape. They’ll smell like heaven! Peek at 15 mins—ovens vary. Want extra crunch? Bake 5 mins longer.
Step 5: The Egg Drop
Pull the tin out (hot mitts, please!). Crack an egg into each nest—aim for the yolk centered. Pro tip: Crack eggs into a ramekin first, then slide in. Prevents shell mishaps! Season eggs with salt/pepper.
Step 6: Second Bake & Flair
Return to oven. Bake 10-12 mins for runny yolks, 12-15 for set. At 8 mins, scatter cheese or bacon on top if using. Chef hack: For perfect yolks, pull baskets at 10 mins—they keep cooking in the hot tin!
Step 7: The Grand Exit
Let baskets cool 2 mins in the tin. Then, slide a butter knife around edges to loosen. Gently lift out with a fork or mini spatula. Patience, grasshopper! Rushing = basket breakage.
Plating Like a Pro 🍽️
Slide these golden cuties onto a rustic wooden board or bright plates—contrast makes ’em pop! Garnish with flaky salt, cracked pepper, and a confetti of fresh chives. Pair with avocado slices, crispy bacon soldiers, or a zesty arugula salad. Brunch bonus: Serve directly in the muffin tin for a fun, family-style vibe (just warn guests it’s HOT!). For fancy points? Drizzle with sriracha mayo or herb oil. Remember: Food tastes better when it looks joyful!
Shake It Up! 5 Tasty Twists
- Mediterranean: Spinach + feta + sun-dried tomatoes in the egg.
- Southwest Fiesta: Mix 1 tsp taco seasoning into hash browns. Top eggs with black beans, corn, and jalapeños.
- Veggie Power: Swap sweet potato shreds! Add roasted bell peppers to nests.
- Cheeseburger: Press cooked ground beef into nests before adding egg. Finish with cheddar and pickle relish.
- Dairy-Free Delight: Use oil instead of butter, skip cheese, and top with avocado or dairy-free pesto.
Behind the Scenes: My Basket Chronicles
Alright, confession time: My first attempt at these looked like potato asteroids with overcooked eggs. Sad trombone! But practice makes perfect. Now, I add a pinch of cornstarch to extra-wet potatoes for crunch insurance. The recipe’s also evolved for crowds—double it in a 12-cup tin, or make mini versions in a 24-cup tin for parties (bake 15 mins + 8 mins). Funny story: Once, my dog Buster “helped” by stealing a cooling basket off the counter. He’s now a lifelong fan (don’t worry, eggs are dog-safe in moderation!). Moral? Embrace the mess. These baskets are forgiving, flexible, and full of delicious surprises.
Your Burning Questions, Answered 🔥
Q: Help! My baskets are sticking like glue.
A: Grease is non-negotiable! Use butter or non-stick spray, and really coat those cups. Let baskets rest 2 mins after baking before loosening with a knife. Still stuck? Next time, try silicone muffin liners—they’re game-changers.
Q: Why are my eggs rubbery?
A: Overbaking is the culprit. Pull them at 10 mins—they’ll keep cooking outside the oven. For silky yolks, aim for 10-12 mins max. Also, room-temp eggs cook faster than fridge-cold ones!
Q: Can I prep these ahead?
A: Totally! Prep the hash brown nests and bake them 20 mins. Cool, then refrigerate overnight. Next morning, add eggs and bake 12-15 mins straight from the fridge. Easy-peasy.
Q: Frozen hash browns vs. fresh?
A: Both work! Frozen is convenient (thaw and squeeze DRY). Fresh shreds (use Russets!) offer slightly better texture. Avoid bagged “potato puffs”—they’re too starchy.
Crispy Hash Brown Egg Baskets
- Total Time: 45–55 minutes
Description
Hey brunch lovers! Ready to turn ordinary spuds into muffin-tin masterpieces? These Crispy Hash Brown Egg Baskets are golden, crunchy on the outside, and silky-centered thanks to a perfectly baked egg cradled inside. Whether you’re chasing kids, impressing guests, or brunching solo in your coziest robe, this recipe is as fun to make as it is to eat. No fancy equipment, no complicated steps—just a little potato magic and a whole lot of delicious.
Ingredients
-
3 cups shredded hash browns (fresh or thawed frozen)
-
2 tbsp melted butter (or olive/coconut oil for dairy-free)
-
Salt & black pepper (to taste—don’t skimp!)
-
6 large eggs (room temp = even baking)
Optional Add-ins:
-
½ cup shredded cheese (cheddar, Swiss, feta…)
-
Cooked bacon bits, diced ham, or sautéed mushrooms
-
Chopped fresh chives or herbs
-
Garlic powder or smoked paprika (¼ tsp for a flavor twist)
Instructions
Step 1: Preheat & Grease
-
Preheat oven to 400°F (200°C).
-
Generously grease a 6-cup muffin tin with oil, butter, or non-stick spray. (Use a pastry brush to coat every crevice—hash browns will cling.)
Step 2: Prep the Potatoes
-
In a bowl, mix shredded hash browns with melted butter, 1 tsp salt, and ½ tsp black pepper.
-
Squeeze and mix with your hands until the shreds are evenly coated and slightly softened.
Step 3: Form the Nests
-
Divide the mixture into 6 muffin cups.
-
Press firmly into the bottoms and up the sides to form a ¼-inch-thick nest. Use fingers or a small glass. No skimpy walls—we’re building brunch architecture here!
Step 4: First Bake (Crisp It!)
-
Bake for 20–25 minutes, or until edges are deeply golden and centers are set.
-
For extra crisp, add 3–5 minutes longer. Check at 15 minutes to avoid burning.
Step 5: Add the Eggs
-
Carefully remove tin from oven. Crack an egg into each basket (crack into a ramekin first for control and no shell drama).
-
Season eggs with salt and pepper.
Step 6: Second Bake (Finish ‘Em!)
-
Return to oven and bake:
-
10–12 minutes for runny yolks
-
12–15 minutes for fully set eggs
-
-
At the 8-minute mark, sprinkle cheese or add toppings if using.
Step 7: Cool & Release
-
Let sit in tin for 2–3 minutes to firm up.
-
Gently run a butter knife around each basket and lift with a fork or mini spatula. Be patient—too quick = crumbly crash zone.
Notes
-
Dry those potatoes! Squeeze in a clean towel or paper towels—excess moisture = soggy baskets.
-
Want to prep ahead? Bake hash brown nests the day before and refrigerate. Crack in eggs and bake in the morning.
-
Love spice? Add jalapeño slices or hot sauce to the egg before baking.
-
Serving idea: Pair with avocado slices, fresh fruit, or a side of arugula salad for brunch elegance.
- Prep Time: 15 minutes
Nutrition
- Calories: 180 kcal per serving
- Sugar: 0g
- Fat: 11g
- Carbohydrates: 11g
- Fiber: 1g
- Protein: 9g
Nutritional Per Basket (Approximate)
- Calories: ~170
- Protein: 7g
- Carbs: 11g
- Fat: 11g
- Fiber: 1g
Psst—add cheese or bacon? Adjust accordingly. These are naturally low-carb and protein-packed!