Let’s Make Some Magic: Chocolate M&M Granola Bars!
Hey, snack squad! Harper here, your kitchen partner-in-crime. 🥄✨ Raise your hand if you’ve ever stared into the snack abyss at 3 PM—that gnawing hunger where you need something NOW, but also want it to taste like a party? Yeah, me too. That’s exactly why we’re whipping up these Chocolate M&M Granola Bars today. Imagine chewy oats hugging melty chocolate chips, crunchy M&Ms popping with color, all held together by a sticky-sweet nut butter hug. These bars are your edible high-five: perfect for lunchboxes, post-workout fuel, or sneaking from the fridge at midnight (no judgment!). They come together faster than you can say “hangry,” need ZERO baking, and taste like pure joy. Ready to turn pantry staples into something extraordinary? Let’s grab that wooden spoon and make magic!
My First (Slightly Chaotic) Batch
Picture this: It’s 2017, and I’m frantically prepping snacks for a cross-country road trip with my niece Lily. She’s 7, obsessed with rainbows, and declared, “Aunt Harper, I NEED candy in my granola bars.” Challenge accepted! I dumped M&Ms into my basic oat mixture, praying it wouldn’t become a crumbly disaster. As we pressed the mix into the pan, Lily “accidentally” ate half the topping M&Ms—giggling with chocolate-smeared cheeks. When we finally sliced them at a rest stop in Arizona? Total victory dance! Lily’s eyes lit up like fireworks, and truckers at the next pump asked where we bought them. Now, every time I make these, I see her little hands carefully arranging extra M&Ms on top. Food memories? That’s the real magic, friends.
Your Kitchen Treasure Hunt
Gather these heroes: (Measurements are your friendly guidelines—cooking is art!)
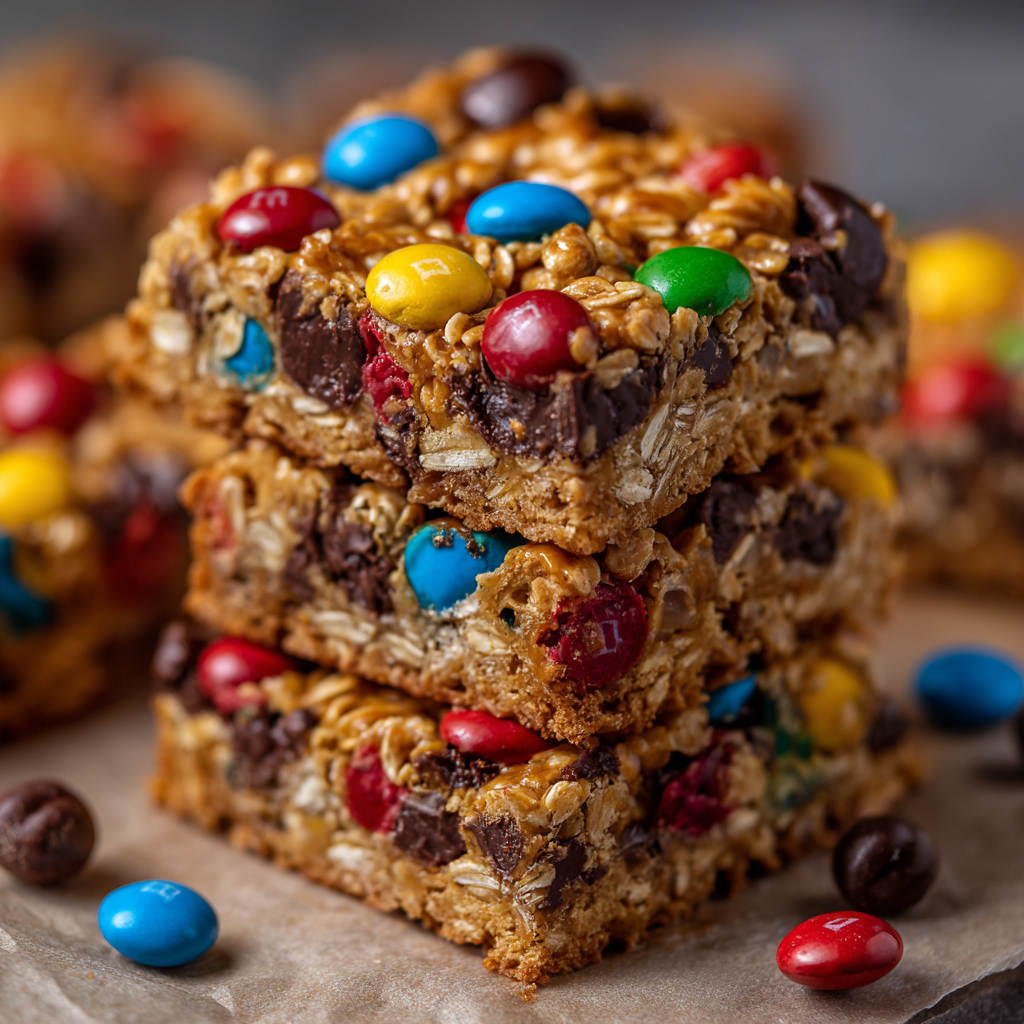
- Rolled oats (2 cups): The hearty backbone! Chef tip: Don’t use instant oats—they turn mushy. Steel-cut? Too tough. Rolled oats give that perfect chew.
- Chocolate chips (¼ cup): Melty pockets of joy. Swap it: Use dark, milk, or white chocolate chips. Allergy-friendly? Try cacao nibs for crunch.
- M&Ms (¼ cup + extra for topping): The fun factor! Pro move: Reserve some for pressing on top—makes ’em Instagram-pretty.
- Nut butter (⅓ cup): The glue! Peanut butter is classic, but almond or sunflower butter work great for allergies or flavor twists.
- Honey (¼ cup): Nature’s sticky gold. Vegan? Sub maple syrup. Runny honey blends best!
- Butter or oil (2 tbsp): Butter = richness, oil = neutral. Insight: Coconut oil adds a subtle tropical vibe.
- Vanilla extract (1 tsp): The flavor fairy! Always use pure vanilla—imitation tastes sad.
- Salt (pinch): Secret weapon! Balances sweetness and makes flavors POP.
Let’s Get Building! (No Hard Hats Required)
Step 1: Melt the glue crew. In a saucepan over low heat, combine nut butter, honey, and butter/oil. Stir until it’s smooth and lava-like (2-3 mins). ⚠️ Watch closely! High heat burns nut butter—nobody wants bitter bars. Remove from heat, then stir in vanilla and salt. That aroma? Heavenly.
Step 2: Party mix time! In a big bowl, toss rolled oats, chocolate chips, and M&Ms. Fun hack: Freeze your M&Ms for 10 mins first—they won’t melt when mixed!
Step 3: Unite the teams! Pour the warm glue mixture over the dry ingredients. Move quickly and stir until every oat is shiny and coated. It’ll look alarmingly wet—that’s perfect! If it seems dry, add 1 tsp honey.
Step 4: Pack it down. Line an 8×8 pan with parchment paper (overhanging edges = easy removal!). Dump in the mix. Now, PRESS LIKE YOUR SNACK LIFE DEPENDS ON IT. Use a glass with a flat bottom or wet hands. Compact bars = no crumbles. Artistically press extra M&Ms on top.
Step 5: Chill out, bars! Refrigerate for 1 hour (or freeze for 20 mins if impatient). This sets the glue. Resist cutting early! Patience = clean slices.
Step 6: Slice and celebrate! Lift bars out using parchment. Cut into 10 rectangles or 12 squares. Store in an airtight container—they’ll last 2 weeks (if hidden well!).
How to Serve Up the Joy
These bars shine brightest at room temp! Pack them in wax paper for lunchboxes, stack ’em on a vintage plate for picnics, or crumble over yogurt for “grown-up” parfaits. Feeling fancy? Drizzle melted chocolate over the top before chilling. For kids? Cut into fun shapes with cookie cutters (re-roll scraps!). Pro tip: Layer bars with parchment in your container—they won’t stick together!
The Science Behind the Perfect No-Bake Granola Bar
Ever wondered why some granola bars crumble into sad little piles while others hold together like edible bricks of joy? It’s all about the science of binding, texture, and temperature. Let’s nerd out for a sec—because understanding the “why” makes you a better snack wizard.
The Glue Theory
Nut butter and honey aren’t just tasty—they’re structural superheroes. Honey’s high fructose content keeps things sticky even when cool, while nut butter’s oils and proteins solidify when chilled, acting like edible cement. For the perfect bind:
-
Heat matters: Warming the honey-nut butter mix (to about 140°F/60°C) thins it, ensuring even coating. Too hot? It caramelizes and hardens weirdly. Too cold? Clumpy mess.
-
Ratios rule: Too much oat? Crumbly. Too much glue? Gummy. The 2:1:¼ ratio (oats:nut butter:honey) is your golden ticket.
Oat Integrity
Rolled oats are the MVP here. Their flattened shape creates layers that lock in the glue, while their slight starchiness helps bind. Instant oats? Too fine—they turn mushy. Steel-cut? Too rigid—they’ll stab your palate like tiny spears.
Chocolate’s Temper Tantrum
M&Ms and chocolate chips stay solid during mixing thanks to their candy shells and stabilizers. But pro tip: Toss them in with the oats before adding the warm glue. The dry coating prevents meltdowns (literal ones).
The Packing Principle
Physics alert! Pressing the mix compacts air pockets, forcing the glue into every nook. Use 15-20 lbs of pressure (about the weight of a toddler’s fist—hi, Lily!). Under-pressed bars = loose rubble.
Chill Factor
Refrigeration isn’t just waiting time—it’s when the magic happens. As the fats in nut butter cool, they crystallize, firming up the bars. Skip this, and you’ve got granola soup.
Fun fact: Humidity affects texture! On muggy days, add 1 extra tbsp oats to absorb moisture. In arid climates, a tsp of extra honey prevents Sahara-dry bars.
The Psychology of Snack Hacks (Why These Bars Beat Store-Bought)
Let’s be real: Grocery store granola bars are often sad, cardboard-ish disappointments wrapped in plastic. Here’s why homemade versions—especially these M&M-studded beauties—win every time:
1. The Joy of Customization
Store-bought bars cater to mass appeal (translation: bland). At home, you’re the CEO of Snackville. Prefer salty-sweet? Add pretzels. Love coconut? Toast some flakes. Allergic to nuts? Sunflower butter saves the day. This personal touch triggers dopamine—the brain’s “I did something awesome” chemical.
2. The Nostalgia Factor
M&Ms aren’t just candy; they’re memory capsules. That crunch? The rainbow colors? They transport adults back to childhood lunchboxes and kids to… well, current joy. Studies show colorful foods increase perceived sweetness (so you can actually use less sugar without noticing).
3. The “I Made This!” High
There’s primal satisfaction in creating sustenance. Psychologists call it “self-efficacy”—the boost we get from mastering a task. Even if it’s just mixing oats and honey, that little victory fuels confidence. (Bonus: Kids who cook become adventurous eaters—ask Lily, now a sushi-loving teen!)
4. The Sneaky Health Wins
Sure, these taste like dessert, but compare:
-
Store-bought: Often contain hydrogenated oils, high-fructose corn syrup, and “chocolatey” coatings (aka not real chocolate).
-
Homemade: You control the sugar, use real dark chocolate, and can sneak in flaxseed or protein powder.
5. The Ritual of Sharing
Food psychologist Brian Wansink found that homemade treats strengthen social bonds. These bars become more than snacks—they’re love language. (“Mom packed my favorite bars!” or “Harper made us road trip snacks!” melts hearts faster than chocolate chips.)
Global Granola Bar Adventures (Flavor Twists from Around the World)
Why stop at classic M&Ms? Let’s take these bars on a world tour with flavor combos inspired by global treats:
1. Japanese Matcha Crunch
-
Swap 1 tbsp oats for matcha powder.
-
Use white chocolate chips + chopped pistachios.
-
Top with puffed quinoa for crunch.
Why it works: Matcha’s earthiness balances the sweet honey, mimicking traditional wagashi (Japanese sweets).
2. Italian Affogato Bars
-
Add 1 tsp instant espresso powder to the glue mix.
-
Fold in crushed amaretti cookies (¼ cup) with the oats.
-
Drizzle with melted gianduja (hazelnut chocolate).
Why it works: Bitter coffee + sweet almond channels Italy’s beloved dessert.
3. Mexican Hot Chocolate
-
Mix ½ tsp cinnamon + pinch cayenne into the glue.
-
Use dark chocolate chips + pepitas (pumpkin seeds).
-
Top with a sprinkle of sea salt.
Why it works: Heat + chocolate is a combo dating back to Aztec xocolatl rituals.
4. Australian Lamington Bars
-
Replace ¼ cup oats with desiccated coconut.
-
Add diced dried apricots (¼ cup).
-
After chilling, dip bars in melted dark chocolate + roll in coconut.
Why it works: This down-under classic gets portable!
5. South African Amarula Bars
-
Soak ¼ cup dried mango in Amarula liqueur (or orange juice) for 30 mins, then chop.
-
Add with the oats + sub caramel-flavored M&Ms.
Why it works: Amarula’s creamy fruitiness nods to the beloved African liqueur.
Pro Tip: For authentic vibes, play regional music while mixing—samba for Brazilian-inspired bars, opera for Italian. Taste is multisensory!
Mix It Up, Buttercup!
1. Peanut Butter Cup: Swap chocolate chips for chopped Reese’s cups + peanut butter.
2. Tropical Escape: Use coconut oil, add ¼ cup dried pineapple/mango, and swap M&Ms for banana chips.
3. Protein Power: Stir in 2 tbsp vanilla protein powder with the oats + use almond butter.
4. Gluten-Free/Vegan: Ensure certified GF oats, use maple syrup, and vegan chocolate.
5. Birthday Bash: Rainbow sprinkles + birthday cake M&Ms!
Harper’s Extra Nuggets of Wisdom
Over the years, I’ve learned: Weather matters! Humid day? Add 1 extra tbsp oats. Dry climate? A splash more honey. These bars are forgiving—once, I subbed crushed pretzels for ½ cup oats (salty-sweet heaven!). Lily (now 14!) still demands we make these monthly, but we’ve upgraded to fancy dark chocolate M&Ms. The best part? Watching friends take that first bite and whisper, “YOU made these?!” Yes, yes I did—and so can you. 🎉
Your Burning Questions, Answered!
Q: Why did my bars crumble? 😭
A) Not enough glue! Pack the mixture tighter next time. B) Didn’t measure honey precisely—add 1 extra tbsp if mix seems dry. C) Skipped the chill time! Patience, grasshopper.
Q: Can I use quick oats?
I don’t recommend it—they absorb too much moisture and turn gummy. Rolled oats give that perfect chew!
Q: How do I make these less sweet?
Swap half the honey for unsweetened applesauce, use dark chocolate chips, and reduce M&Ms to 3 tbsp.
Q: Can I freeze them?
Absolutely! Wrap bars individually, freeze for up to 3 months. Thaw at room temp for 10 minutes.

Chocolate M&M Granola Bars
- Total Time: 1 hr 10 mins
Description
No-bake joy bars bursting with chewy oats, melty chocolate, and rainbow M&Ms. These sweet snacks come together in minutes and disappear even faster—perfect for lunchboxes, post-gym pick-me-ups, or sneaky midnight bites. Let the snack magic begin!
Ingredients
-
2 cups rolled oats
-
¼ cup chocolate chips (any variety)
-
¼ cup M&Ms + extra for topping
-
⅓ cup nut butter (peanut, almond, or sunflower)
-
¼ cup honey (or maple syrup)
-
2 tbsp butter or coconut oil
-
1 tsp vanilla extract
-
Pinch of salt
Instructions
-
Melt the base: In a saucepan, heat nut butter, honey, and butter/oil over low. Stir until smooth, then remove from heat. Stir in vanilla and salt.
-
Mix dry: In a large bowl, combine oats, chocolate chips, and M&Ms (freeze M&Ms first for less melting!).
-
Combine: Pour warm mixture over dry ingredients and mix well. It should be glossy and slightly sticky.
-
Press: Line an 8×8 pan with parchment. Press the mix down firmly using hands or a glass. Add extra M&Ms on top.
-
Chill: Refrigerate for 1 hour (or freeze 20 mins) until set.
-
Slice & store: Cut into 10 bars. Store in an airtight container for up to 2 weeks (or freeze for 3 months).
Notes
-
Add 2 tbsp protein powder for a boost.
-
Swap M&Ms with dried fruit or sprinkles for flair.
-
Use coconut oil for a tropical twist.
-
Crumbly bars? Add more honey or press harder.
- Prep Time: 10 mins
Nutrition
- Calories: 170 kcal per serving
- Sugar: 13g
- Fat: 8g
- Carbohydrates: 22g
- Protein: 3g
Nutritional Cheat Sheet (Per Bar)
Calories: 170 | Fat: 8g | Carbs: 22g | Sugar: 13g | Protein: 3g
Note: Values vary by ingredients used. For lower sugar, try sugar-free chocolate chips!
Prep Time: 10 mins | Chill Time: 1 hour | Total Time: 1 hour 10 mins | Yields: 10 bars
Final Thoughts
Granola bars are the ultimate blank canvas—equal parts pantry clean-out project and edible art. Whether you’re a stressed parent, a meal-prep warrior, or a midnight snack raider, these Chocolate M&M Granola Bars are your delicious rebellion against boring food. They prove that “homemade” doesn’t mean fussy, that joy can be handheld, and that the best recipes are the ones stained with chocolate fingerprints and memories. So go ahead: swap ingredients, lick the spoon, and gift them in scribbled-on napkins. Because the world needs more unapologetic sweetness—both in snacks and in spirit. Now, who’s ready to raid the pantry