Turn Your Breakfast Cereal Into Snacking Magic!
Hey there, kitchen rockstar! Harper here, waving my wooden spoon from my sun-drenched countertop. Remember those Saturday mornings when you’d tip three different cereals into one bowl, creating your own crunchy masterpiece? Today, we’re taking that childhood joy and transforming it into portable, hug-in-a-bar goodness with these Cereal Mix Granola Bars! Imagine: Cheerios bringing their honey-kissed cheer, Shreddies adding their cozy wheaty warmth, and Bran Flakes sneaking in wholesome whispers – all held together by sticky-sweet hugs from honey and oats. No fancy equipment needed, just one bowl, one pan, and about 10 minutes of hands-on magic before letting the fridge do the rest. Whether you’re packing lunchboxes, fueling a hiking adventure, or just taming that 3pm rumble, these bars are your new edible high-five. Let’s ditch the store-bought cardboard and make snack time taste like pure, unadulterated nostalgia with a grown-up wink. Ready to make your kitchen smell like a happy childhood memory? Let’s roll up those sleeves!
My Cereal Box Symphony (and That One Epic Kitchen Fail)
Picture this: 8-year-old me, standing on a wobbly stool in Grandma Dot’s kitchen, determined to create the “Ultimate Super Cereal.” I’d sneak fistfuls of every box in her pantry (sorry, Grandpa’s bran flakes!) into a mixing bowl taller than my head. One fateful Sunday, fueled by cartoons and ambition, I added *way* too much milk. My “cereal soup” cascaded over the rim like a crunchy Niagara Falls, creating a lake of soggy wheat and corn puffs on her linoleum. Grandma just chuckled, mopped it up, and said, “Harper, sweetness, sometimes less milk makes more magic.” That messy lesson stuck! These granola bars are my grown-up redemption arc – capturing that wild cereal joy but actually holding together. They’re the triumphant encore to my kitchen-floor symphony, proof that even epic fails can lead to something deliciously sturdy. Every time I press that oat-cereal mixture into the pan, I give a little nod to Grandma Dot and her infinite patience.
Your Cereal Crew & Flavor Boosters
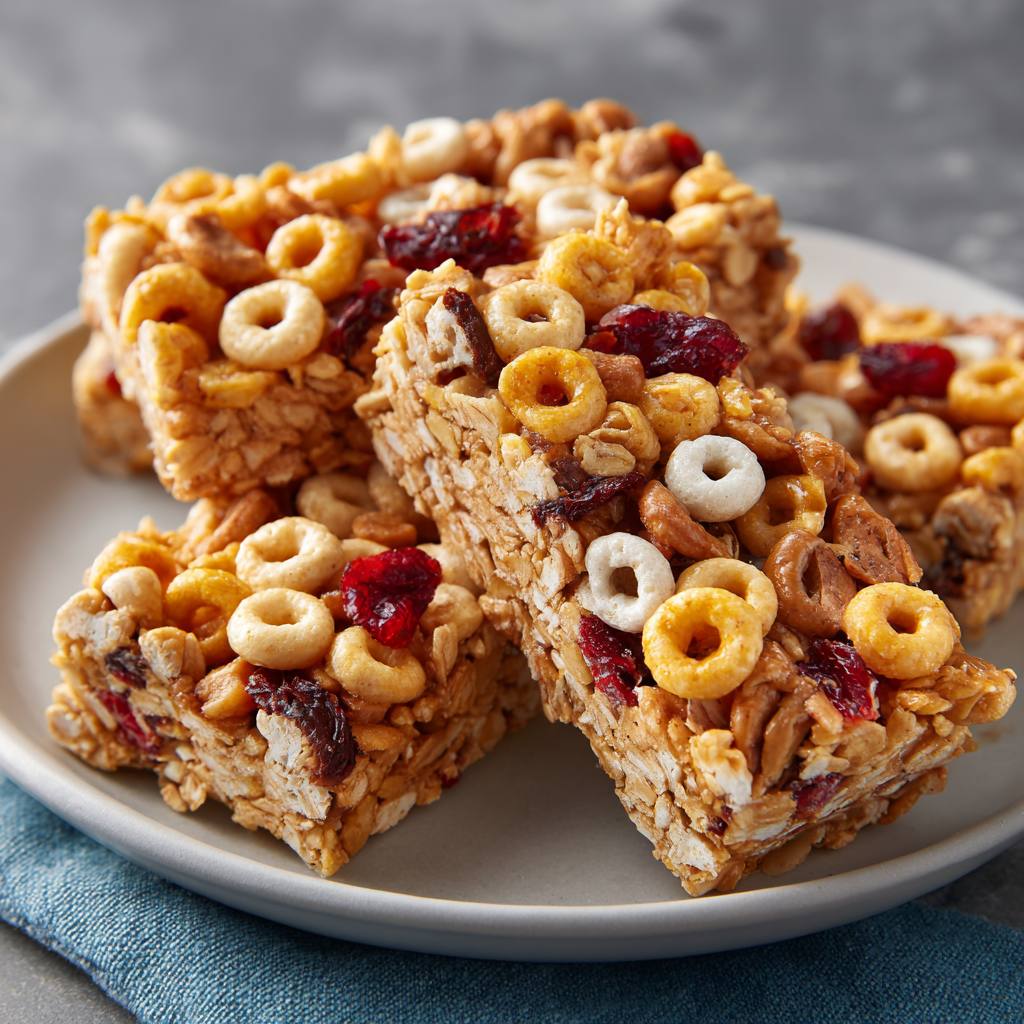
- Cheerios (1 cup): Our friendly O’s bring light sweetness and that signature *crunch*! Chef’s Tip: Swap for Corn Chex for gluten-free or use multigrain Cheerios for extra depth.
- Shreddies (1 cup): These little wheat squares add malty warmth and hold their shape beautifully. Chef’s Tip: Can’t find Shreddies? Shredded wheat biscuits roughly broken work wonders!
- Bran Flakes (1 cup): Don’t snooze on these! They add nutty flavor, fiber, and help bind. Chef’s Tip: Substitute with crushed Weetabix or plain cornflakes if needed.
- Rolled Oats (1 cup): The hearty backbone! Use old-fashioned, not instant. Chef’s Insight: Toast them dry in a pan for 5 mins first for an incredible nutty aroma.
- Honey (⅓ cup): Nature’s golden glue! It adds floral sweetness and flexibility. Sub Alert: Pure maple syrup works, but bars will be slightly softer.
- Butter or Oil (¼ cup): Butter = rich flavor, Oil = neutral & dairy-free. Chef’s Secret: Coconut oil adds a lovely subtle tropical note!
- Vanilla Extract (1 tsp): The warm hug in every bite. Always use pure extract for best flavor.
- Pinch of Salt: Crucial! It balances the sweetness and makes flavors pop. Don’t skip!
Let’s Build Those Bars: Step-by-Step Crunch Creation
- Warm Up the Glue: Grab your saucepan! Melt the honey and butter/oil together over low heat. We’re aiming for warm and fluid, not boiling lava! Stir gently until it becomes one happy, glossy pool. Watch Closely: Burnt honey is bitter – low and slow wins here! Remove from heat the second it’s smooth.
- Flavor Infusion Station: Off the heat, whisk in the vanilla extract and that all-important pinch of salt. Smell that? Pure magic! This step blooms the vanilla’s flavor. Harper’s Hack: Add a tiny pinch of cinnamon here for a cozy background note!
- Cereal Party in a Bowl: In your largest mixing bowl, toss together the Cheerios, Shreddies, Bran Flakes, and rolled oats. Channel your inner 8-year-old and mix with joy! Pro Tip: Gently crush some Bran Flakes in your hands as you add them – helps with binding!
- The Big Pour & Gentle Tumble: Slowly drizzle the warm honey mixture over the dry cereal mountain. Grab a sturdy spatula and fold gently! We want everything coated, not crushed into dust. Key Move: Work quickly before the syrup cools and clumps. Think “tossing a salad,” not “kneading dough.”
- Press It Like You Mean It! Line your 9×9 inch pan with parchment paper (overhanging edges = lifesaver!). Dump the mixture in. Now, grab another piece of parchment and use it to press down HARD with your hands or a flat-bottomed glass. Seriously compact it – this is the secret to bars that don’t crumble! Harper’s Must-Do: Press for a full minute, getting into every corner.
- The Chill Factor: Pop the pan into the fridge for at least 1 hour. No cheating! This sets the “glue” and firms everything up. Patience Perk: This is your perfect time to lick the spatula and wash that saucepan!
- Slice & Celebrate: Use the parchment overhang to lift your giant granola slab onto a cutting board. Grab a sharp knife and cut into bars or squares. Clean Cuts: Wipe the knife blade between cuts for neat edges. Admire your handiwork!
How to Serve Up Your Cereal Swagger
These bars are superstars straight from the fridge in your hand! But let’s amp up the joy: For lunchboxes, wrap them individually in parchment paper and tie with baker’s twine – adorable and eco-friendly! Hosting brunch? Stack them artfully on a rustic board with fresh berries and yogurt for dipping. Feeling fancy? Melt a little dark chocolate, drizzle it over the top before chilling, and sprinkle with sea salt flakes. Hiking fuel? Tuck a couple into a reusable bag with some dried fruit. They’re sturdy at room temp for several hours, making them perfect picnic partners. Basically, anywhere you need a burst of crunchy, sweet, satisfying energy, these bars are ready to report for duty!
Mix It Up: Your Granola Bar Playground
This recipe is your blank canvas! Here are 5 fun twists to try once you’ve mastered the classic:
- Choco-Crunch Craze: Stir in ¼ cup mini chocolate chips AFTER adding the warm syrup (so they don’t melt completely). Add 2 tbsp cocoa powder to the dry mix too!
- Tropical Escape: Swap ½ cup cereal for chopped dried mango and coconut flakes. Use coconut oil instead of butter!
- PB&J Remix: Replace 2 tbsp honey with peanut butter in the syrup. Press a thin layer of jam onto the top before chilling!
- Seedy Powerhouse (Gluten-Free!): Use GF cereals and oats. Add 3 tbsp each chia seeds, pumpkin seeds, and sunflower seeds to the dry mix.
- Autumn Spice: Add 1 tsp cinnamon + ¼ tsp nutmeg to the dry mix. Stir in ⅓ cup chopped dried apples after coating.
Harper’s Honest Kitchen Confessions
Okay, real talk: The first time I made these, I was *so* impatient I only chilled them for 20 minutes. Let’s just say I invented “Cereal Mix Granola Crumble” (still tasty, but messy!). Lesson learned: Patience makes perfect bars! This recipe evolved from my need to use up cereal box dregs – seriously, who ever finishes all three at once? Now, I deliberately buy extras just for bars. I love how forgiving they are; swap cereals based on your pantry or mood! My husband calls them my “kitchen glitter” because they turn ordinary ingredients into something sparkly and special. One funny note: My dog, Biscuit, is OBSESSED with the smell of the honey-butter mix. I’ve perfected the “one-handed pour while holding back a determined terrier with the other” move!
Granola Bar Guru: Your Questions Answered
Q: My bars fell apart! What did I do wrong?
A: The most common culprit is not pressing firmly enough! Really compact that mixture – use muscle! Also, ensure your honey mixture is warm enough to coat everything well, and don’t skimp on chill time. If using maple syrup, expect slightly softer bars.
Q: Can I use quick oats instead of rolled oats?
A: I don’t recommend it. Rolled oats provide essential chew and structure. Quick oats can turn the bars mushy. Stick with old-fashioned rolled oats for the best texture!
Q: How long do these bars actually last?
A: Stored airtight in the fridge, they stay fresh and firm for up to 2 weeks! At room temp (in a cool place), they’ll last about 4-5 days but might soften slightly. They also freeze beautifully for up to 3 months – wrap individually!
Q: Are they kid-friendly? My little one is picky!
A: Absolutely! This is a fantastic recipe to get kids involved. Let them choose the cereals (within reason!) or add mini mix-ins like rainbow sprinkles or tiny dried fruit pieces. The familiar cereal flavors are usually a big hit!

Cereal Mix Granola Bars
- Total Time: 1 hr 10 mins
Description
Turn your cereal box leftovers into chewy, crunchy, nostalgic snack bars that taste like your childhood but are ready for grown-up life. Perfectly sweet, satisfyingly crisp, and made in minutes—this is your snack-time glow-up!
Ingredients
-
1 cup Cheerios
-
1 cup Shreddies (or shredded wheat)
-
1 cup Bran Flakes (or cornflakes/Weetabix)
-
1 cup rolled oats (old-fashioned)
-
⅓ cup honey (or maple syrup for vegan)
-
¼ cup butter or coconut oil
-
1 tsp vanilla extract
-
Pinch of salt
Instructions
-
Melt + Mix: In a saucepan, melt honey and butter/oil over low heat. Stir until smooth, then remove from heat and stir in vanilla + salt.
-
Toss Cereal Party: In a large bowl, mix oats, Cheerios, Shreddies, and Bran Flakes.
-
Combine: Pour warm syrup over cereal mix. Stir quickly until everything is evenly coated.
-
Press Firmly: Line a 9×9 pan with parchment. Press mixture in very firmly—use a spatula or glass for best results.
-
Chill: Refrigerate for at least 1 hour to set.
-
Slice & Store: Cut into bars and store airtight in fridge (up to 2 weeks) or freeze individually.
Notes
-
Toast oats for 5 mins before mixing for deeper flavor.
-
Add ¼ cup mini chocolate chips after mixing for a sweet crunch.
-
Press hard + chill fully = no crumbles!
-
Try autumn spice mix (1 tsp cinnamon + ¼ tsp nutmeg) for cozy vibes.
- Prep Time: 10 mins
Nutrition
- Calories: 140 kcal per serving
- Sugar: 9g
- Fat: 6g
- Carbohydrates: 20g
- Protein: 2g
Nutritional Nibbles (Per Bar)
Calories: 140 | Fat: 6g | Carbs: 20g | Sugar: 9g | Protein: 2g
Note: Values are estimates and can vary based on specific ingredients/brands used.
Prep Time: 10 minutes | Chill Time: 1 hour | Total Time: 1 hour 10 minutes | Yields: 12 bars
Final Thoughts: A Recipe for Connection
At its heart, this recipe is more than a snack—it’s a celebration of resourcefulness and nostalgia. It turns the overlooked (almost-empty cereal boxes, that lone bag of oats) into something craveable. It’s a reminder that cooking doesn’t require perfection; my childhood “cereal soup” disaster proves that even flops can lead to future brilliance.
These bars also carry a quiet magic: They’re memory keepers. The honey’s floral notes might remind you of summers at Grandma’s. The crunch of Shreddies could teleport you to Saturday morning cartoons. And when you share them, you’re passing on that joy—whether it’s with a toddler proudly unwrapping their lunchbox or a friend savoring a care package after a long day.
So here’s my challenge to you: Make a batch, then give half away. Watch how a simple bar becomes a conversation starter, a comfort, or even the start of someone else’s kitchen adventure. Because the best recipes aren’t just about feeding the body—they’re about nourishing the soul, one crunchy, sticky, honey-drizzled bite at a time.