Sunshine in a Bar: Your New Favorite On-The-Go Treat!
Hey there, kitchen friend! Harper here, waving my trusty wooden spoon from my sun-drenched corner of culinary chaos. Ever have one of those mornings where you’re simultaneously trying to pour coffee, find your keys, and answer three texts… and breakfast becomes a distant dream? Or maybe you’re staring into the snack abyss mid-afternoon, craving something that tastes like joy but won’t leave you crashing? Friend, I’ve been there more times than I’ve burned toast (and trust me, that’s saying something!). That’s exactly why I’m practically vibrating with excitement to share these Blueberry Coconut Granola Bars with you today.
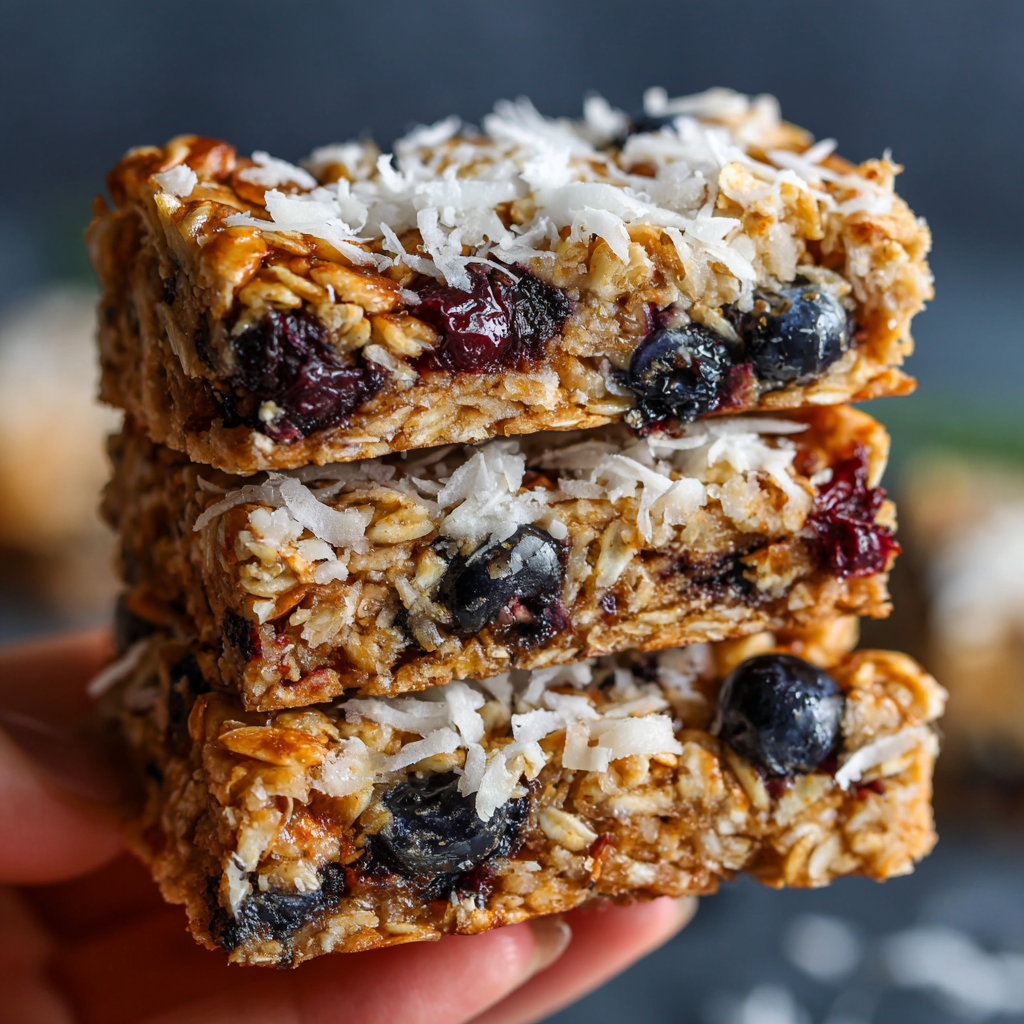
Imagine this: chewy, hearty oats hugging plump, tangy dried blueberries, all tangled up with sweet, toasty coconut flakes. They’re held together with a warm, golden hug of honey and vanilla – simple, pure magic. It’s like a little burst of tropical sunshine meeting cozy comfort in every single bite. These bars aren’t just fuel; they’re a mini-vacation for your taste buds, perfect for stashing in your bag for hikes, tucking into lunchboxes, or sneaking with your morning cuppa while the world wakes up. No fancy equipment, no obscure ingredients – just pure, delicious, feel-good energy ready in about 10 minutes of hands-on time (plus a little chill session). Ready to stir up some sunshine? Let’s do this!
A Sticky Situation & The Birth of a Lifesaver
Okay, picture this: It’s 6 AM. My hiking buddy, Maya, is beeping outside, the sun is barely up, and I’m frantically trying to pack snacks for our big trail adventure. I grab a box of store-bought “energy” bars that taste suspiciously like cardboard mixed with sadness. Halfway up the mountain, fueled by pure willpower and lackluster snacks, Maya groans, “Harps, these taste like compressed sawdust. Next time, you bring the snacks!” Challenge accepted.
Back in my little kitchen, mission “Trailblazing Treat” commenced. I wanted something bursting with flavor, naturally sweet, sturdy enough to survive a backpack, and easy enough to whip up pre-dawn. I remembered the giant bag of dried blueberries I impulse-bought (no regrets!) and the coconut flakes whispering “tropical escape” from the pantry. After a few… let’s call them “textural experiments” (we don’t speak of the crumbly disaster of Batch #2), I nailed it. The moment Maya took her first bite of the final version on our next hike, her eyes lit up. “Whoa. This tastes like happiness! Did you pack extras?” That’s the magic – turning a sticky kitchen experiment into little bars of portable joy that make adventures (and hectic Tuesdays) infinitely sweeter.
Gathering Your Sunshine Squad: The Ingredients
Here’s the beautiful, simple lineup for your blueberry coconut bliss! The beauty is in the flexibility – see my notes for easy swaps:
- 2 cups Rolled Oats (Old-Fashioned, not instant!): Our hearty, chewy base! They give that satisfying bite and hold everything together. **Chef’s Insight:** Don’t use instant oats – they get mushy! Rolled oats are key for texture.
- ½ cup Dried Blueberries: Tangy little bursts of sunshine! They add pops of flavor and chewy goodness. **Sub Tip:** No dried blueberries? Chopped dried cherries, cranberries, or even raisins work beautifully!
- ½ cup Shredded Coconut (sweetened or unsweetened): Hello, tropical vibes! Sweetened gives more caramelized flavor, unsweetened lets the honey shine. **Chef’s Insight:** For extra toastiness, spread the coconut on a baking sheet and pop it in a 350°F oven for 3-5 minutes (watch closely!) before adding. *Chef’s kiss!*
- ⅓ cup Honey: Nature’s golden glue! It sweetens, binds, and gives that gorgeous glossy finish. **Sub Tip:** Vegan? Pure maple syrup works perfectly! Agave nectar is another option, but honey gives the best binding power.
- ¼ cup Butter or Oil (like coconut, avocado, or mild olive oil): Adds richness and helps everything stick. **Chef’s Insight:** Butter = classic comfort flavor. Coconut oil = intensifies the tropical feel! Choose your adventure.
- 1 tsp Pure Vanilla Extract: The warm, aromatic hug that ties all the flavors together. Always use pure extract for the best flavor!
- Pinch of Salt (don’t skip this!): Our flavor superhero! It balances the sweetness and makes every other ingredient taste MORE like itself. Seriously, it’s magic.
Let’s Build Some Bars! Simple Steps to Snack Heaven
Ready? This is where the fun happens! Grab a saucepan and a big bowl – let’s create magic together.
- The Warm Hug: “Combine the honey and butter (or oil) in a small saucepan. Place it over LOW heat. **Harper’s Hot Tip:** Low and slow is the name of the game here! We just want everything melted and friendly, not boiling or bubbling aggressively. Stir gently with a silicone spatula or wooden spoon until it’s smooth and combined. This usually takes 2-3 minutes. Once melted, pull it off the heat! Immediately stir in that glorious vanilla extract and the all-important pinch of salt. Give it a good whisk – smell that? That’s the smell of victory (and deliciousness).”
- Dry Team Assemble: “In your largest mixing bowl, toss together the rolled oats, dried blueberries, and shredded coconut. **Harper’s Hack:** If you toasted your coconut earlier (highly recommended!), let it cool slightly before adding it here. Use your spoon or clean hands to mix everything up so the blueberries and coconut aren’t all clumped together – we want even distribution for maximum flavor in every bite!”
- The Big Mix-Off: “Pour that warm, fragrant honey mixture over your dry ingredients. Now, channel your inner mix master! Use a sturdy spatula and stir, stir, stir until every single oat, berry, and coconut flake is beautifully coated and glistening. It’ll seem sticky at first – that’s perfect! **Crucial Tip:** Make sure no dry patches remain at the bottom of the bowl. This coating is what binds our bars!”
- Press It Real Good: “Line an 8×8 inch baking pan with parchment paper, letting the paper overhang on two opposite sides (this is your lifting handle later!). Dump the sticky granola mixture into the pan. Now, here’s the SECRET for perfect, non-crumbly bars: PRESS LIKE YOUR SNACK LIFE DEPENDS ON IT! Use the bottom of a flat measuring cup, a glass, or even your (clean!) fingers wrapped in a bit of parchment. Press *extremely* firmly and evenly across the entire surface, especially into the corners. The harder you press now, the better they’ll hold together later. This is your workout for the day!”
- The Patience Game (Chill Time!): “Pop the pan into the refrigerator. Let it chill undisturbed for at least 1 hour, or until it’s completely firm. **Harper’s Reality Check:** I know, waiting is tough! But this step is non-negotiable. It sets the honey binder rock solid. Use this time to clean up, dance to your kitchen playlist, or dream about your first bite!”
- Slice & Savor: “Lift the chilled granola slab out of the pan using the parchment paper overhangs. Place it on a cutting board. Grab a sharp knife. **Pro Slicing Tip:** For super clean cuts, briefly run your knife under hot water and wipe it dry between slices. Cut into bars or squares – I usually get 10 generous bars. Admire your handiwork!”
Sunshine Serving Ideas
These bars are superstars all on their own, tucked into a lunchbox or backpack! But why stop there? Crumble one over creamy Greek yogurt or coconut yogurt for a dreamy breakfast parfait. Pack them alongside apple slices and almond butter for a satisfying snack plate. Feeling fancy? Warm one slightly and serve it à la mode with a scoop of vanilla bean ice cream for a deconstructed crumble dessert! They’re also the perfect edible gift – stack them in a cute jar or box tied with twine. However you serve them, get ready for smiles.
Make It Your Own! Fun Flavor Twists
Love the base recipe? Let’s play! Here are some delicious ways to riff on it:
- Tropical Dream: Swap the dried blueberries for chopped dried mango and pineapple. Add 2-3 tablespoons of chopped macadamia nuts with the oats. Use coconut oil for maximum island vibes!
- Chocolate Berry Bliss: After pressing the mixture into the pan, sprinkle ¼ cup of mini dark chocolate chips or chopped dark chocolate over the top before chilling. Press them in lightly.
- Seedy Crunch Boost: Add 2 tablespoons each of chia seeds, sunflower seeds, and pepitas (pumpkin seeds) to the dry ingredients for extra texture, fiber, and nutrients.
- Nutty Delight: Stir ¼ cup of chopped almonds, pecans, or walnuts into the dry mix for a satisfying crunch and protein punch.
- Protein Powerhouse: Add 2-3 tablespoons of your favorite vanilla or unflavored protein powder to the dry ingredients. You might need an extra teaspoon or two of honey if it seems too dry.
Harper’s Heart (and a Few Laughs)
Oh, these bars! They’ve truly become a staple in my kitchen rhythm. I love how forgiving they are – remember my Batch #2 disaster story? I learned the hard way that skimping on the pressing step leads to delicious-but-disappointing granola *crumble* (still tasty over yogurt, mind you!). Now, I practically use my body weight pressing them in! They’ve evolved too. Sometimes I add a whisper of cinnamon or orange zest to the warm honey mix for a cozy or citrusy twist. The best part? Seeing my nephew’s face light up when he finds one tucked into his backpack, or hearing from friends who’ve made them their own. One friend even crumbles them over oatmeal! That’s the true joy – sharing something simple that sparks a little everyday happiness. Just promise me you’ll press them firmly… and maybe do a little kitchen dance while you wait for them to chill?
Your Granola Bar Questions, Answered!
Let’s tackle some common kitchen curiosities:
- Q: Can I use fresh or frozen blueberries instead of dried?
A: Unfortunately, no. Fresh or frozen berries add WAY too much moisture and will make your bars soggy and prevent them from setting properly. Dried fruit is essential for the right texture and binding! - Q: Help! My bars are falling apart! What did I do wrong?
A: Two likely culprits! First: Not pressing firmly enough. You really need to compact that mixture with serious muscle. Second: Not chilling long enough. That hour (or more) in the fridge is crucial for the honey binder to set hard. If it’s a warm day, chill longer. Also, ensure you used rolled oats, not instant, and measured your honey accurately. - Q: How long do these granola bars keep? How should I store them?
A: Store them in an airtight container at room temperature for up to 5 days, or in the fridge for up to 2 weeks for maximum freshness (they get a bit chewier chilled, which I love!). You can also freeze them for up to 3 months! Layer them between parchment paper in a freezer bag. Thaw at room temp or pop one straight into a lunchbox – it’ll thaw by snack time. - Q: Can I use something besides honey? My bars seem too soft/sweet.
A: Absolutely! Pure maple syrup is a great vegan swap, but note it can make the bars slightly softer than honey. If you find the bars too sweet, try using unsweetened shredded coconut and reducing the honey to ¼ cup + 1 tablespoon. Taste the mixture before pressing – you can add an extra tablespoon of oats if it seems overly wet.
Blueberry Coconut Granola Bars
- Total Time: 1 hr 10 mins
Description
Packed with chewy oats, tangy dried blueberries, and toasted coconut flakes, these no-bake bars are sunshine in snack form. Perfectly portable, subtly sweet, and ready in minutes—your mornings (and mid-afternoon slumps) just got a lot brighter!
Ingredients
-
2 cups rolled oats (old-fashioned)
-
½ cup dried blueberries
-
½ cup shredded coconut (sweetened or unsweetened)
-
⅓ cup honey (or maple syrup)
-
¼ cup butter or coconut oil
-
1 tsp pure vanilla extract
-
Pinch of salt
Instructions
-
Melt the base: In a small saucepan over low heat, melt honey and butter/oil until smooth (2–3 mins). Remove from heat and stir in vanilla + salt.
-
Mix dry: In a large bowl, combine oats, dried blueberries, and coconut.
-
Combine: Pour warm honey mixture over dry ingredients. Mix thoroughly until evenly coated.
-
Press firmly: Line an 8×8-inch pan with parchment. Transfer mixture and press it down firmly using a spatula or measuring cup.
-
Chill: Refrigerate for at least 1 hour until firm.
-
Slice & store: Lift out with parchment, slice into 10 bars. Store airtight at room temp (5 days), fridge (2 weeks), or freezer (3 months).
Notes
-
Tropical: Use dried mango or pineapple instead of blueberries + coconut oil
-
Chocolate: Sprinkle ¼ cup mini chocolate chips on top before chilling
-
Seedy Boost: Add 2 tbsp each chia, sunflower, and pumpkin seeds
-
Nutty: Stir in ¼ cup chopped almonds or pecans
- Prep Time: 10 mins
Nutrition
- Calories: 160 kcal per Bar
- Sugar: 9g
- Fat: 7g
- Carbohydrates: 22g
- Protein: 3g
Final Thoughts: More Than Just a Snack
These Blueberry Coconut Granola Bars are a testament to how a little creativity can turn pantry staples into something extraordinary. They’re a reminder that food isn’t just fuel—it’s a way to add joy to busy days, connect with others (like Maya on that hike), and express love in edible form. Whether you stick to the classic recipe or spin it into a dozen variations, the heart of it remains: wholesome, homemade goodness that fits into your life, one sticky, sunshine-filled bite at a time.