Triple Chocolate Granola Bars: Your New Snack Obsession
Hey, chocolate lovers! Harper here, your kitchen cheerleader, waving a wooden spoon speckled with chocolate like a victory flag. 🏳️🌈🍫 Ever have one of those days where you’re sprinting between school drop-offs, work zooms, and that mysterious pile of laundry multiplying in the corner? Your stomach growls, your energy tanks, and that sad desk salad just won’t cut it. Enter: these Triple Chocolate Granola Bars—your edible superhero cape. Imagine chewy oats hugging rich cocoa, studded with pools of dark and white chocolate, all held together with sticky-sweet honey. They’re not just a snack; they’re a 3pm mood-lifter, a lunchbox surprise, or that “I deserve joy” moment with your afternoon coffee. No fancy equipment, no finicky steps—just 10 minutes of stirring, an hour of chilling (perfect for folding laundry… or not 😉), and boom: happiness in bar form. Let’s turn your kitchen into a chocolate haven!
My Chocolate-Stained “Aha!” Moment
Picture this: It’s 2018. I’m hosting my niece’s birthday party. I’d spent hours on an elaborate chocolate cake… only to trip over my very enthusiastic (and very large) golden retriever, Baxter. Cake met floor. Tears (mine) met frosting. In a panic, I scanned my pantry—oats, cocoa, honey, chocolate chips. I threw them together, pressed the mess into a pan, and crossed my fingers. An hour later? Kids were devouring these chewy, fudgy bars, declaring them “way better than cake!” Baxter got extra belly rubs for his unintentional genius. That messy kitchen disaster taught me something magical: sometimes the simplest, thrown-together things spark the most joy. These bars? They’re my edible happy accident. Every bite still reminds me: perfection is overrated. Delicious is everything.
Gather Your Chocolatey Crew
- 2 cups rolled oats: The hearty base! Use old-fashioned, not instant or steel-cut. They give that perfect chew. Gluten-free? Certified GF oats work beautifully!
- 2 tbsp cocoa powder: Your deep chocolate soul. Dutch-processed adds extra richness, but natural works too. Feeling adventurous? Swap in 1 tbsp espresso powder for a mocha kick!
- ¼ cup dark chocolate chips: Pockets of intense bliss. 70% cacao is my sweet spot. No chips? Chop up a dark chocolate bar—it melts even more luxuriously!
- ¼ cup white chocolate chips: Creamy sweetness to balance the dark. Cheat code? Use vanilla baking chips if white chocolate’s not your jam.
- ⅓ cup honey: Nature’s sticky glue! It binds everything and adds floral notes. Vegan? Maple syrup works—just add an extra 5 minutes chilling time.
- ¼ cup butter or oil: Richness central! Melted butter = decadent flavor. Coconut oil (refined, no coconut taste) keeps it dairy-free. Both create that perfect crisp-chewy edge.
- 1 tsp vanilla extract: The flavor amplifier! Pure vanilla makes the chocolate sing. Bourbon vanilla? Even better.
- Pinch of salt: The unsung hero! It cuts the sweetness and makes the chocolate pop. Don’t skip it—trust me.
Let’s Build Chocolate Magic!
- Warm the Glue: Grab a small saucepan. Toss in your butter (or oil) and honey. Warm it over low heat—we’re melting, not boiling! Stir until it’s one smooth, glossy pool (about 2 mins). Chef Hack: Swirl the pan instead of constant stirring to prevent over-heating. Remove from heat!
- Cocoa Party Time: Whisk in the cocoa powder, vanilla, and that crucial pinch of salt. Get it really smooth—no cocoa lumps allowed! It’ll look like liquid velvet. Pro Tip: Sift your cocoa first if it’s clumpy!
- Oat Hug Fest: Dump your rolled oats into a big bowl. Pour that gorgeous warm chocolate mixture over them. Stir like you mean it! Every oat should be coated in shiny, chocolatey goodness. Fun Move: Scrape the saucepan with a rubber spatula—that’s flavor gold!
- Chill (Literally & Figuratively): Let the mixture cool for 5-7 minutes. Why? Tossing in hot chips = melted puddles, not lovely chunks. Patience, grasshopper!
- Chip Folding Finesse: Add both dark and white chocolate chips. Gently fold them in with a spatula—don’t smash! We want distinct chocolate treasures throughout. Secret: Reserve 1 tbsp of each chip for sprinkling on top later for extra pretty.
- Press It Real Good: Line an 8×8-inch pan with parchment paper (let it overhang for easy lifting!). Dump in the mixture. Now, PRESS. Use a flat-bottomed glass or measuring cup. Press hard and evenly—this prevents crumbly bars! Top with reserved chips, pressing lightly so they stick.
- The Big Chill: Slide the pan into the fridge. Set a timer for 1 hour. No Peeking! This firms everything up perfectly. Use this time to… dance? Wash one dish? Stare lovingly at your creation through the fridge door?
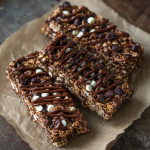
- Slice & Celebrate: Lift the slab out using the parchment. Place it on a cutting board. Use a sharp knife to slice into bars (I do 10 rectangular beauties). Wipe the knife between cuts for clean edges. Admire your handiwork! You chocolate genius, you.
Serving Up the Joy
These bars are stars straight from the fridge! Stack them in a mason jar for a cute countertop snack station, or wrap individually in parchment paper + twine for lunchbox gold. Pair with a cold glass of almond milk for dunking, or crumble one over vanilla ice cream (hello, instant dessert!). Store leftovers (ha!) in an airtight container in the fridge for up to 2 weeks—they get even fudgier! For room temp? Let them sit 10 mins; the chocolate gets silkier.
The Science of Chewy vs. Crunchy (And How to Master Both)
Not all granola bars are created equal. Some crave a sink-your-teeth-in chew, while others want a shattering crispness. Here’s how to hack your texture:
The Chewy Code
-
Honey Ratio: More honey = chewier bars. For extreme bend, up it to ½ cup and reduce oats by ¼ cup.
-
Butter’s Role: Melted butter creates a denser, fudgier bite than oil. Vegan? Coconut oil solidifies when chilled, mimicking butter’s chew.
-
Press-and-Chill: Skipping the full hour in the fridge? Your bars will crumble. Cold temps solidify the fats, binding everything.
Crunchy Lover’s Fixes
-
Toast Your Oats: Spread raw oats on a baking sheet at 350°F for 10 minutes before mixing. They’ll stay crisp even after honey coating.
-
Add Seeds: Mix in 2 tbsp chia or flaxseeds—they absorb moisture, adding snap.
-
Bake ‘Em: Press mixture into pan, bake at 300°F for 15 minutes, then chill. The heat evaporates excess moisture for a firm bite.
The Chocolate Paradox
White chocolate chips melt faster than dark, creating creamy pockets. For defined chunks, freeze chips for 10 minutes before folding in. Or, chop bars instead of using chips—their irregular edges resist melting.
Pro Tip: For layered texture, reserve ½ cup of the oat mix before adding chocolate. After pressing the main layer, sprinkle the dry oats on top and press again. Result? A crispy top with a gooey center!
Mix It Up, Buttercup!
- Salty Pretzel Crunch: Fold in ⅓ cup crushed pretzel pieces with the oats. Finish with flaky sea salt before chilling. Sweet + salty = addictive!
- Cherry Almond Bliss: Swap white chips for dried tart cherries + add ¼ cup chopped toasted almonds. Use almond extract instead of vanilla. Pure bliss!
- Peanut Butter Cup: Replace 2 tbsp butter with creamy peanut butter in the warm mixture. Fold in chopped peanut butter cups instead of white chips. *Mic drop*.
- Protein Powerhouse: Add ¼ cup vanilla protein powder with the oats. Use coconut oil. Boom—post-workout fuel!
- Tropical Escape: Swap dark chips for chopped dried mango + white chips for toasted coconut flakes. Add a pinch of cinnamon to the honey mix. Vacation in a bar!
Harper’s Heart-to-Heart
Okay, real talk: my first batch? Total soup. I didn’t press firmly enough, and it crumbled like my ego. Lesson learned: PRESS LIKE YOUR SNACK HAPPINESS DEPENDS ON IT (it kinda does). Over the years, I’ve added the “cool before adding chips” step (RIP, melted puddle bars) and the parchment paper lift (game-changer!). These bars have traveled to bake sales, comforted friends, and survived my toddler’s grabby hands. They’re forgiving! Too crumbly? Add 1 tbsp more honey next time. Too hard? Reduce chill time by 10 mins. Cooking’s a dance, not a rigid march. Laugh at the mess, savor the chocolate, and remember: food made with joy always tastes better. Now go forth and conquer!
Your Burning Chocolate Bar Questions, Answered!
- Help! My bars are falling apart! Don’t panic! You likely didn’t press firmly enough. Crumble it over yogurt as delicious granola! Next time: press HARD with something flat and heavy. Also, ensure you’re using rolled oats, not quick oats—they bind better.
- Can I freeze these? Absolutely! Wrap individual bars tightly in plastic wrap, then stash in a freezer bag for up to 3 months. Thaw in the fridge overnight or zap for 15 seconds. Perfect for emergency chocolate cravings!
- Why did my white chocolate turn brown/gray? Ah, the dreaded “seize”! White chocolate is delicate. If your oat mixture was too hot when you added it, it can discolor or get grainy. That’s why cooling for 5-7 minutes is crucial! If it happens, it’s still tasty—just less pretty.
- Can I use sugar instead of honey? You can, but texture changes! Honey adds chew and stickiness. If using maple syrup or agave, same swap. Granulated sugar won’t bind as well—try ¼ cup brown sugar + 2 tbsp milk heated with the butter instead.
Triple Chocolate Granola Bars
- Total Time: 1 hour 10 mins
Description
Busy day? These no-bake bars are your chewy, fudgy lifesavers. Packed with rolled oats, rich cocoa, and a double hit of dark and white chocolate, they’re sweet but balanced, indulgent yet wholesome. Perfect for lunchboxes, road trips, or that sacred solo coffee break, they’re fast to make, fun to eat, and freezer-friendly. Say hello to your new go-to snack!
Ingredients
-
2 cups rolled oats
-
2 tbsp cocoa powder (Dutch or natural)
-
¼ cup dark chocolate chips
-
¼ cup white chocolate chips
-
⅓ cup honey (or maple syrup for vegan)
-
¼ cup melted butter or refined coconut oil
-
1 tsp vanilla extract
-
Pinch of salt
Instructions
-
Melt & Mix: In a saucepan over low heat, melt butter and honey until glossy. Stir in cocoa, vanilla, and salt until smooth.
-
Combine: In a bowl, pour chocolate mixture over oats. Stir well. Cool 5–7 mins.
-
Add Chips: Fold in dark and white chocolate chips. Reserve a few for topping.
-
Press: Line an 8×8 pan with parchment. Press mixture in firmly. Add reserved chips on top.
-
Chill: Refrigerate 1 hour. Lift out and slice into 10 bars.
Notes
-
Too soft? Add more oats.
-
Too crumbly? Add extra honey or press harder.
-
Add-ins: Pretzels, dried fruit, peanut butter cups, or protein powder.
- Prep Time: 10 mins
Nutrition
- Calories: 160 kcal per Bar
- Sugar: 12g
- Fat: 7g
- Carbohydrates: 22g
- Protein: 22g
Nutritional Nibbles (Per Bar)
Calories: 160 | Fat: 7g | Carbs: 22g | Sugar: 12g | Protein: 2g
Prep Time: 10 mins | Chill Time: 1 hour | Total Time: 1 hour 10 mins | Yields: 10 bars
Final Thoughts
These Triple Chocolate Granola Bars are more than a recipe—they’re a reminder that joy hides in simplicity. Whether you’re frantically wrapping them for a school lunch or gifting them to a grieving friend (because chocolate is the universal “I love you”), they carry the magic of accidental perfection.
So here’s my challenge to you: Make a batch today. Let the honey drip onto the counter. Let your kid “help” stir and spill cocoa everywhere. Lick the spoon like you’re 10 years old. Because the world needs more uncomplicated, chocolate-stained happiness.