
Chile Relleno Quesadilla: Your New 10-Minute Obsession
Hey kitchen pals! Harper here, waving my trusty wooden spoon at you from my sunny little cooking nook. Ever have one of those days where you’re craving the cozy, smoky hug of a chile relleno but don’t want to deal with batter, frying, or washing six pans afterward? *raises hand dramatically* That exact craving led to this beautiful kitchen mashup: the Chile Relleno Quesadilla! Imagine all the soul-warming goodness of roasted poblano and oozy cheese tucked into a golden, buttery tortilla – ready in 10 minutes flat. No deep-fryer, no fuss, just pure comfort with crispy edges. This isn’t just food; it’s a flavor fiesta that turns “I don’t feel like cooking” into “Wait, I MADE this?!” moments. Whether you’re a busy parent, a midnight snacker, or just someone who believes cheese is a food group (you’re my people), this recipe’s about to become your edible happy place. Ready to make some magic?
The Accidental Love Affair
Picture this: It’s 2016, and I’m crammed into a tiny Oaxacan street food stall with three friends. Rain’s dripping off the plastic tarp overhead, but we’re ignoring it because we’re hypnotized by the vendor’s hands stuffing charred peppers with cheese. That first bite of chile relleno? Pure fireworks! Fast-forward to my Brooklyn apartment two years later. I’m desperately trying to recreate that memory, but my batter keeps sliding off the peppers like a bad sweater. Frustrated, I grab a tortilla, throw in the rogue pepper and cheese, and press it in a skillet. The crispy, gooey result made us all freeze mid-bite – then erupt in “WHY didn’t we think of this before?!” cheers. That glorious accident became our rainy-day ritual. Now, every time I smell poblanos roasting, I’m back under that leaky tarp… just with less mess and more crispy edges. Life upgrade!
Your Flavor Toolkit
Grab these simple stars (and my chef-y secrets for each!):
- ½ tbsp unsalted butter – Our golden crisp-maker! Salted butter works too (just skip extra salt). Vegan? Coconut oil or avocado oil rocks here.
- 1 large flour tortilla (10-inch) – The hug for our filling! Burrito-sized gives room to fold. Gluten-free? Use GF tortillas – warm them first so they don’t crack.
- ¾ cup shredded Monterey Jack – The melt-master! Chef insight: Pre-shredded bags have anti-caking agents that make melting sluggish. For ultra-gooeyness, block cheese > grater > happy dance.
- ½ roasted & peeled poblano pepper – The smoky heart! Swap savvy: Canned green chiles work in a pinch (drain well!), but roasting fresh is flavor GOLD.
- ⅙ tsp garlic powder – Our stealth flavor bomb! Granulated garlic or ½ clove fresh minced works too (add with peppers to avoid burning).
- ½ tbsp chopped fresh cilantro – (Optional) The confetti! Hate cilantro? Sub parsley, chives, or just skip it. Your kitchen, your rules!
Pro tip: Double or triple everything! These disappear faster than cookies at a bake sale.
Let’s Build Your Flavor Masterpiece!
- Char that pepper like a boss! Hold poblano with tongs over gas flame (or broil on baking sheet) until blistered and blackened. Drop into a bowl, cover with plastic wrap, and let steam 10 mins. Rub off skin – don’t stress about perfection! Chef hack: Wear gloves if your skin’s sensitive to pepper oils! Slice into strips. (Pssst: Roast extra peppers and freeze for future you!)
- Butter up & lay the foundation. Melt butter in skillet over medium heat. Swirl to coat. Lay tortilla in skillet. Sprinkle half with ⅓ of the cheese – this creates a “glue” layer! Watch your heat: Medium keeps butter golden, not scorched. Listen for that gentle sizzle!
- Pile on the joy. Arrange poblano strips over cheese. Sprinkle garlic powder and cilantro (if using) like you’re seasoning happiness. Top with remaining cheese – blanket everything! Chef wisdom: Cheese on top AND bottom seals the deal and prevents filling escape!
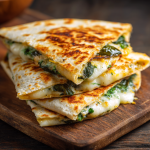
- Fold & flip with confidence! Fold tortilla in half. Cook 2-3 mins until bottom is golden and lace-like. Slide spatula under, whisper “you got this,” and flip! Flip fear? Use a plate: Slide quesadilla onto plate, place skillet upside-down over it, then invert. Cook other side 2-3 mins until crispy and cheese is lava-level melty.
- Rest & conquer. Slide onto cutting board. Wait 1 minute (I KNOW, torture!) – this lets cheese set slightly so it doesn’t volcano out. Slice into wedges. Admire your handiwork!
The Science Behind the Perfect Melt (And Why Your Cheese Matters)
Let’s geek out for a moment about cheese—because not all melts are created equal. Ever noticed how some quesadillas turn into a glorious, stretchy masterpiece while others become a greasy, clumpy mess? There’s actual science at play here, and it all comes down to cheese chemistry.
The Melting Magic
Cheese melts based on its moisture content, fat ratio, and acidity. Monterey Jack, our star here, is a high-moisture, low-acid cheese with a buttery fat content (around 30-33%). This combo makes it melt into that dreamy, elastic lava we crave. Compare that to aged cheeses like Parmesan, which are drier and crumbly—great for grating, terrible for quesadillas.
The Pre-Shredded Problem
Those convenient pre-shredded bags? They’re coated with cellulose (a plant-based anti-caking agent) to prevent clumping. But that same coating also inhibits melting, leading to a grainy texture. For the smoothest melt, always grate your cheese fresh from the block. Pro tip: Pop your cheese in the freezer for 10 minutes before grating—it’ll shred more cleanly!
The Temperature Tango
Cheese melts best between 90°F and 110°F (32°C–43°C). Too hot, and the fat separates, leaving you with a greasy pool. Too low, and it just sits there, stubbornly solid. That’s why medium heat is key—it gives the cheese time to melt evenly without breaking down.
The “Glue Layer” Hack
Sprinkling cheese directly onto the tortilla first (before adding fillings) creates a “glue” that seals the deal. As it melts, it binds the tortilla to the other ingredients, preventing fillings from escaping during the flip. This is especially crucial for heavier add-ins like beans or meat.
Fun Experiment: Try a blend of cheeses! Mix Monterey Jack with a bit of mozzarella for extra stretch, or a smoky gouda for depth. Just avoid oily cheeses like queso fresco—they’ll leave your tortilla soggy.
The Cultural Mashup: How Two Classics Became One
The Chile Relleno Quesadilla isn’t just a recipe—it’s a delicious collision of culinary traditions. Let’s unpack how these two Mexican staples joined forces:
Chile Relleno’s Rich History
Originating in Puebla, Mexico, the chile relleno (literally “stuffed pepper”) dates back to the 16th century. Nuns at the Convent of Santa Monica are credited with inventing it, stuffing poblano peppers with minced meat, nuts, and spices, then battering and frying them. Over time, cheese became the star filling, and the dish spread globally.
Quesadilla’s Humble Roots
The quesadilla began as a simple tortilla folded over cheese (from the Nahuatl word quesaditzin). In central Mexico, it’s traditionally made with corn tortillas and Oaxaca cheese, while northern regions use flour tortillas. The beauty? Its versatility—it’s a canvas for endless fillings.
Why This Mashup Works
-
Texture Contrast: The fried batter of a classic relleno is replaced by the crispy tortilla—lighter, but equally satisfying.
-
Speed: Frying a battered pepper takes 20+ minutes; this hack delivers the same flavors in 10.
-
Portability: Quesadillas are inherently hand-held, making them ideal for busy lives.
A Modern Twist on Tradition
While purists might raise an eyebrow, fusion food is how cuisine evolves. Think of the Korean taco or sushi burrito—this is no different. It honors the essence of both dishes while adapting to modern needs.
Regional Variations to Try:
-
Oaxacan Style: Use a corn tortilla and stringy Oaxaca cheese.
-
Border Influence: Add a sprinkle of cumin or smoked paprika for Tex-Mex flair.
-
Coastal Twist: Fold in lump crab or shrimp for a surf-and-turf vibe.
The 5-Minute Sauce Bar: Elevate Your Quesadilla Game
A great quesadilla deserves even better dips. Here’s how to whip up restaurant-worthy sauces in minutes:
1. Avocado Crema
-
Blend: 1 ripe avocado + ½ cup sour cream + 1 garlic clove + juice of 1 lime + salt.
-
Pro Tip: Add a handful of cilantro or a jalapeño for kick.
2. Smoky Chipotle Mayo
-
Mix: ½ cup mayo + 1 minced chipotle in adobo + 1 tsp adobo sauce + 1 tsp honey.
-
Chef’s Secret: A dash of smoked paprika deepens the flavor.
3. Quick-Pickled Onions
-
Combine: 1 thinly sliced red onion + ½ cup hot vinegar (1:1 vinegar and water) + 1 tbsp sugar + 1 tsp salt. Let sit for 15 minutes.
4. Roasted Tomato Salsa
-
Char: 2 tomatoes and ¼ onion under the broiler. Blend with 1 garlic clove, 1 jalapeño, and salt.
5. Queso Dip Emergency Fix
-
Microwave: 1 cup shredded cheese + 2 tbsp milk in 30-second bursts, stirring until smooth. Stir in diced green chiles.
Sauce Pairing Guide:
-
Classic: Avocado crema + salsa.
-
Spicy Lovers: Chipotle mayo + pickled onions.
-
Cheese Overload: Queso dip + extra Monterey Jack.
Storage Tips: Most sauces keep for 3-5 days in the fridge (except avocado crema—best fresh).
Plate It Like a Pro (Minimal Effort, Max Wow!)
Slide those gorgeous wedges onto a vibrant plate – the contrast makes the golden crust pop! Serve piping hot with sides for dipping and dunking: A scoop of cool avocado crema, chunky tomato salsa, or lime-spiked sour cream. Feeling fancy? Quick-pickled red onions add zing! For a mini feast, pair with a zesty corn salad or black beans. This isn’t just dinner; it’s a fiesta on a plate!
Make It Uniquely Yours!
This recipe is your flavor playground! Try these twists:
- Meat Lover’s: Add crumbled cooked chorizo or shredded chicken with the peppers!
- Veggie Boost: Toss in black beans, roasted corn, or sautéed mushrooms!
- Cheese Swap: Use pepper jack for heat, Oaxaca for epic stringiness, or smoked gouda for depth!
- Breakfast Edition: Add scrambled eggs and crispy bacon before folding!
- Green Goddess: Mix in chopped spinach or zucchini with the poblanos!
Harper’s Kitchen Confessions
Okay, real talk: The first time I made this, I flipped it like a timid mouse… and lost half the cheese to the skillet gods. Lesson learned? Flip with purpose! This recipe evolved from my “lazy relleno” phase into a weekly staple. My partner now requests it with extra crispy edges (achieved by pressing gently with the spatula while cooking – try it!). The beauty? It scales like a dream. Got friends over? Make a whole platter! They’ll think you slaved for hours. My favorite memory? My niece declaring it “dippy pizza” and demanding it every visit. That’s the magic – it’s fancy enough for guests, easy enough for chaotic weeknights, and loved by tiny humans. Win-win-win!
Your Burning Questions, Answered!
Q: Help! My cheese isn’t melting before the tortilla burns!
A: Heat is likely too high! Medium is the sweet spot. If the tortilla browns too fast, reduce heat slightly and cover the skillet for 30-60 seconds to trap heat and melt the cheese.
Q: Can I prep poblano peppers ahead?
A: Absolutely! Roast, peel, and store peppers in an airtight container in the fridge for up to 5 days, or freeze for 3 months. Game-changer for quick meals!
Q: My quesadilla falls apart when I flip it. What gives?
A: Two likely culprits: 1) Overfilling – keep the filling on half the tortilla with a good cheese border. 2) Flipping too early – wait until the bottom is truly golden and crisp; it holds together better. Use a large, sturdy spatula!
Q: Is there a way to make this less spicy?
A> Poblanos are mild, but seeds and membranes hold heat. For zero spice, remove EVERY seed and white membrane after roasting. Prefer bell peppers? They work, but roast them too for deeper flavor!
Chile Relleno Quesadilla
- Total Time: 10 mins
Description
When your soul craves a cheesy, smoky chile relleno but your schedule screams “I’ve got 10 minutes tops,” this quesadilla swoops in like a culinary superhero. Roasted poblano, melty Monterey Jack, and buttery-crisp tortilla come together in one skillet wonder that delivers all the comfort, zero the mess. One bite and you’re hooked — whether it’s midnight snacking or dinner for two. Get ready for serious flavor, fast.
Ingredients
-
½ tbsp unsalted butter
-
1 large flour tortilla (10-inch)
-
¾ cup shredded Monterey Jack (freshly grated = meltiest magic)
-
½ roasted poblano pepper, peeled and sliced
-
⅙ tsp garlic powder
-
½ tbsp chopped fresh cilantro (optional)
Instructions
-
Roast your pepper: Char over flame or under broiler. Steam 10 mins, then peel and slice.
-
Heat skillet: Melt butter over medium heat. Lay tortilla flat.
-
Build layers: On half the tortilla, sprinkle ⅓ cheese, poblano slices, garlic powder, cilantro, and remaining cheese.
-
Fold & cook: Fold in half. Cook 2–3 mins per side until golden and crisp.
-
Rest & slice: Let it sit 1 min, then cut into wedges and serve hot!
Notes
-
Pre-roast & freeze poblanos for even faster prep.
-
Flip with confidence — a big spatula or plate trick works wonders!
-
Press gently while cooking for extra crispy edges.
- Prep Time: 5 mins
Nutrition
- Calories: 320 kcal per serving
- Fat: 18g
- Carbohydrates: 25g
- Protein: 14g
Nutritional Info (Per Serving)
Calories: ~320 | Fat: 18g | Carbs: 25g | Protein: 14g
Note: Values are estimates. Toppings/dips add extra calories.
Final Thoughts: Why This Recipe Wins
The Chile Relleno Quesadilla is more than a meal—it’s a celebration of ingenuity. It takes the soul-warming comfort of a time-honored dish and makes it accessible to anyone, anytime. Whether you’re a college student with a hot plate, a parent juggling bedtime routines, or just someone who believes food should be fun, this recipe meets you where you are.
So grab that skillet and make it your own. Add bacon, swap cheeses, drown it in sauce—there are no rules, only flavor. And when you take that first crispy, gooey bite? You’ll taste the magic of a kitchen accident that turned into a revelation. Happy cooking, friends!