
Your New Favorite Summer Showstopper: Red, White & Blue Ice Cream Cake
Hey kitchen bestie! Harper here, waving my berry-stained wooden spoon at you from my sunny little corner of the world. Can you smell it? That sweet anticipation in the air when summer hits its stride? When fireflies start their evening dances and the grill becomes your backyard’s center stage? There’s one magical moment I wait for all year long: that glorious second when I lift the cake dome to reveal THIS patriotic beauty – a towering Red, White & Blue Ice Cream Cake that makes everyone at the picnic table gasp.
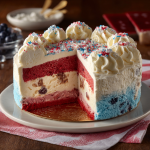
Picture this: velvety vanilla ice cream hugged between two tender cake layers (one blushing berry-red, the other dreamy ocean-blue), all wrapped in clouds of whipped cream and glittering with festive sprinkles. It’s like July 4th fireworks decided to become dessert! Whether you’re hosting a backyard BBQ, heading to a potluck, or just celebrating Tuesday because summer deserves it, this ice cream cake is your secret weapon. No fancy pastry skills needed – just big flavors, cold creamy layers, and that unbeatable *wow* factor. So grab your favorite mixing bowl, crank up those summer tunes, and let’s make some edible magic together!
Grandma’s Sparkler in Dessert Form
Close your eyes for a sec. Imagine a sticky July afternoon in 1998. I’m eight years old, barefoot on a checkered picnic blanket, chasing lightning bugs as dusk paints the sky watermelon-pink. Suddenly, Grandma emerges from the screen door holding something magnificent – a towering frozen cake shimmering with red, white, and blue layers like edible fireworks. “Stand back, firecracker!” she’d laugh, setting it down like crown jewels. That first bite? Absolute magic. The way the cold creaminess melted against the soft cake, how the vanilla sang against sweet berries… it tasted like pure celebration.
Grandma would wink, whispering, “The secret ingredient’s patriotism, sweetpea.” Turns out? It was love. Love in every swipe of whipped cream, every careful sprinkle placement. When she passed her handwritten recipe card to me (splattered with blue food coloring, naturally), it became my summer holy grail. Now, every time I layer this cake, I see her floral apron and feel that childlike wonder. It’s more than dessert – it’s a cold, creamy hug from generations past. And today? I’m bubbling with joy to share that hug with YOU.
Gathering Your Edible Fireworks
Cake Layers:
- Cake Flour (14 oz): Lighter than all-purpose! Creates that tender crumb. Swap: All-purpose flour works, but replace 2 Tbsp per cup with cornstarch.
- Sugar (13 oz): Not just sweetener – it helps aerate the batter for fluffiness.
- Salt (1 tsp): Our flavor booster! Makes the vanilla and berries POP.
- Baking Powder (1 Tbsp) + Baking Soda (½ tsp): The dynamic duo for lift. Check expiration dates – sleepy leaveners = flat cake.
- Egg Whites (5 oz): About 4-5 large eggs. Whipping them creates air pockets! Tip: Use room temp eggs – they whip higher.
- Vegetable Oil (4 oz): Moisture magic! Swap: Melted coconut oil works for subtle tropical vibes.
- Warm Buttermilk (10 oz, split): The tangy MVP for tenderizing. Hack: No buttermilk? Mix 1 Tbsp lemon juice + milk to make 1 cup, wait 5 mins.
- Butter (6 oz, soft): Unsalted is best. Creaming with sugar = fluffy base. Chef Insight: Soften by cubing cold butter, resting 20 mins.
- Vanilla (2 tsp): Pure extract only, please! Imitation tastes sad in ice cream.
- Red & Blue Gel Color (1 Tbsp each): Gel > liquid! Brighter hues without watering down batter.
Ice Cream:
- Vanilla Ice Cream (48 oz): Full-fat premium = creamiest layers. Secret: Let soften 15 mins for easy spreading!
Whipped Cream Frosting:
- Heavy Cream (16 oz): Ultra-cold is non-negotiable for stiff peaks!
- Powdered Sugar (3 oz): Dissolves instantly. Swap: For less sweet, reduce to 2 oz.
- Vanilla (1½ tsp): Double the extract? Yes, please!
- Gelatin (1½ tsp): Our stability hero! Prevents weeping in summer heat.
- Water (2 Tbsp) + Cream (1½ tsp): For blooming gelatin.
- Red, White & Blue Sprinkles: The celebratory confetti! Jimmies hold color best.
Let’s Build Some Edible Patriotism!
Step 1: Bake the Vibrant Cake Layers
Preheat your oven to 350°F (175°C). Grab two 9-inch round pans – line bottoms with parchment AND grease sides. Trust me, this cake deserves a clean exit! In a large bowl, whisk together cake flour, sugar, salt, baking powder, and baking soda. In another bowl, blend softened butter, oil, vanilla, and 8 oz warm buttermilk until silky. Pro Tip: Warm buttermilk prevents butter from seizing! Slowly add dry ingredients to wet, mixing until just combined. In a third bowl, whip room-temp egg whites to soft peaks (they should curl when lifted). Fold whites gently into batter – this keeps it cloud-light! Divide batter evenly. Tint one bowl vibrant red, the other ocean blue with gel colors. Pour into pans, smooth tops, and bake 25-30 mins until springs back when touched. Cool 10 mins in pans, then transfer to wire racks. Hack: Level cakes with a serrated knife while slightly warm – less crumbling!
Step 2: Craft the Ice Cream Layer
Line a 9-inch springform pan with plastic wrap (overhang is key!). Scoop softened vanilla ice cream into pan. Using an offset spatula dipped in hot water, press and smooth into an even layer. Work quickly so ice cream doesn’t melt! Freeze solid for 2 hours. Secret: Place a sheet of parchment on top before pressing for ultra-smooth surface!
Step 3: Whip Up the Stabilized Cream
Bloom gelatin: Sprinkle gelatin over 2 Tbsp cold water in a tiny bowl. Let sit 5 mins until spongy. Microwave 10 seconds until liquid (don’t boil!). Stir in 1½ tsp cream. In a chilled bowl, beat heavy cream, powdered sugar, and vanilla until soft peaks form. Slowly drizzle in warm gelatin while beating. Whip to stiff, glorious peaks! Game Changer: Chill beaters and bowl 20 mins beforehand for faster whipping.
Step 4: Assemble Your Masterpiece
Place blue cake layer on serving plate. Unmold ice cream disc (peel off plastic) onto blue cake. Top with red cake layer. Hot Tip: If cakes domed, place bottom-side up against ice cream for flat surfaces! Immediately frost sides and top with whipped cream using swift strokes. Generously coat sides with sprinkles – press gently so they stick! Freeze entire cake 2+ hours before serving. Cover loosely with parchment to prevent frost.
Presenting Your Patriotic Perfection
Okay, showtime! Pull cake from freezer 10 minutes before slicing – it’ll glide like a dream through those gorgeous layers. Use a sharp knife dipped in hot water (dry between cuts!). Serve on simple white plates – let those colors SHINE! For extra pizazz, garnish slices with fresh raspberries, blueberries, and mint sprigs. Pair with sparking lemonade or iced coffee. Watch eyes light up as they discover the cool ice cream core! Pro tip: Hand out sparklers for guests to make wishes before digging in – pure summer joy.
Mix It Up, Buttercup!
This canvas begs for creativity! Try these tasty twists:
- Berry Blast: Swirl ½ cup mashed raspberries into red cake batter, and blueberries into blue. Fold berry chunks into ice cream!
- Coconut Dream: Use coconut ice cream + fold toasted coconut into whipped cream. Lime zest in cakes? Yes!
- Gluten-Free Glory: Swap cake flour for GF 1:1 blend. Ensure baking powder is GF!
- Cheesecake Swirl: Layer softened strawberry/blueberry cream cheese between ice cream and cakes.
- Mini Marvels: Bake layers in 4-inch pans for personal cakes! Freeze in ramekins.
Harper’s Heart-to-Heart
Confession: My first attempt? A leaning tower of Pisa situation with melted cream rivers. I nearly cried! But Grandma’s voice chimed in: “Sugar, it’s just cake – have fun!” So I scraped it into parfait glasses and called it “Patriotic Pudding.” Perfection’s overrated; joy’s the goal. Over the years, I added gelatin to the cream (game-changer!) and learned gel food coloring prevents sad pastels. The real evolution? Watching my niece add purple sprinkles last year “for unicorn magic.” Made it better. So embrace imperfections – lopsided layers = homemade charm! This cake freezes beautifully for 2 weeks (wrap airtight). Thaw slices 15 mins on the counter before serving. Now go make memories… and send me pics of your edible fireworks!
Your Questions, My Answers!
Q: Can I use liquid food coloring?
A: You *can*, but gels give vibrant hues without thinning batter. With liquid, start with 2 tsp red/blue and add slowly. Expect softer colors.
Q: My whipped cream deflates! Help!
A: Three culprits: 1) Cream/equipment not cold enough – chill bowl 20 mins! 2) Overbeating (stop at stiff peaks). 3) Warm gelatin – cool slightly before drizzling.
Q: Ice cream layer won’t unmold cleanly?
A: Did plastic wrap overhang the pan? Use it to lift! Still stuck? Run a hot towel around pan exterior for 10 seconds.
Q: Can I make components ahead?
A: Absolutely! Bake cakes 2 days ahead (wrap airtight, room temp). Ice cream disc freezes 1 week. Assemble cake 1 day before serving.
Red, White & Blue Ice Cream Cake
Description
Hey, sunshine! Meet your new summer centerpiece: soft, fluffy red and blue cake layers hugging a creamy vanilla ice cream center, all wrapped in whipped cream clouds and glittering sprinkles. It’s fireworks and fireflies on a plate — perfect for BBQs, birthdays, or any Tuesday that needs a wow. Zero fancy skills needed — just layers of love, color, and joy!
Ingredients
Cake Layers:
-
14 oz cake flour (or AP with cornstarch swap)
-
13 oz sugar
-
1 tsp salt
-
1 Tbsp baking powder + ½ tsp baking soda
-
5 oz egg whites (4–5 large)
-
4 oz vegetable oil
-
10 oz warm buttermilk (split)
-
6 oz unsalted butter (soft)
-
2 tsp vanilla extract
-
Red & blue gel food coloring
Ice Cream Layer:
-
48 oz premium vanilla ice cream (softened 15 min)
Stabilized Whipped Cream:
-
16 oz heavy cream (cold!)
-
3 oz powdered sugar
-
1½ tsp vanilla extract
-
1½ tsp gelatin + 2 Tbsp cold water + 1½ tsp cream
-
Red, white & blue sprinkles
Instructions
1️⃣ Bake Cakes: Preheat oven to 350°F (175°C). Line two 9-inch pans. Whisk flour, sugar, salt, baking powder & soda. Mix butter, oil, vanilla, & 8 oz warm buttermilk. Combine dry & wet. Whip egg whites to soft peaks, fold in. Divide batter, tint red & blue. Bake 25–30 min. Cool, level if needed.
2️⃣ Ice Cream Layer: Line 9-inch springform with plastic wrap. Spread softened ice cream into pan. Smooth flat with offset spatula. Freeze 2 hours.
3️⃣ Whipped Cream: Bloom gelatin in water 5 min. Microwave 10 sec, stir in cream. Beat cold cream, sugar, & vanilla to soft peaks. Drizzle in gelatin, whip to stiff peaks.
4️⃣ Assemble: Stack blue cake, ice cream disc, then red cake. Frost with whipped cream, coat sides with sprinkles. Freeze 2+ hours.
Notes
✨ Warm knife = perfect slices.
✨ Chill beaters & bowl for sturdy whipped cream.
✨ Serve with fresh berries for extra sparkle!
Nutrition
- Calories: 420 kcal per serving
Sweet Bite, Bright Life!
Serves 12 | Prep: 40 min | Freeze: 4 hrs | Calories: ~420/slice
Remember: Joy is calorie-free! Balance is key – savor each festive bite mindfully.
Final Thoughts: More Than a Dessert, a Memory Maker
This cake isn’t just about flavors—it’s about moments. The gasp when you reveal those vibrant layers. The sticky-fingered joy of kids (and adults!) catching sprinkles mid-air. The way it brings people together, sparklers in hand, under a twilight sky.
I’ll never forget the year my niece declared, “Aunt Harper, this tastes like fireworks!” That’s the magic—it’s not perfection, but connection. Whether you’re celebrating freedom, summer, or simply the fact that you survived another day, this cake is your edible hug.
So go ahead: Let it lean a little. Laugh when sprinkles go rogue. And remember—like Grandma taught me—the secret ingredient is always love. Now, who’s ready for seconds?